QoS
이 장에서는 REST에서 설정이 가능한 QoS 기능의 사용 방법에 대해 설명합니다.
QoS에 대해
QoS (Quality of Service)는 네트워크에서 데이터의 종류에 따른 우선 순위에 따라 데이터를 전송하거나 특정 통신을 위한 네트워크 대역폭을 예약하고 일정한 속도로 통신 할 수 있도록 하는 기술입니다. OpenFlow는 대역폭 제어에 의한 QoS가 가능합니다.
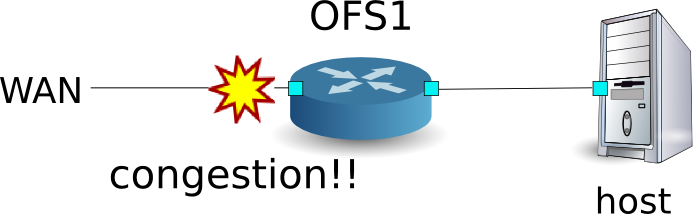
플로우 기반 QoS의 동작 예
다음과 같은 토폴로지를 가정하고 스위치 Queue 설정 및 규칙을 추가하고 적절한 대역폭을 할당하는 예를 소개합니다. 또한 OFS1의 WAN 측 인터페이스에서 트래픽 쉐이핑을 할 경우를 고려하고 있습니다.
환경 구축
우선 Mininet에 환경을 구축합니다. mn 명령의 매개 변수는 다음과
같습니다.
| 매개 변수 | 값 | 설명 |
|---|---|---|
| mac | 없음 | 자동으로 호스트의 MAC 주소를 설정함 |
| switch | ovsk | Open vSwitch를 사용 |
| controller | remote | (별도의) 외부 OpenFlow 컨트롤러 사용 |
| x | 없음 | xterm을 시작 |
실행 예는 다음과 같습니다.
ryu@ryu-vm:~$ sudo mn --mac --switch ovsk --controller remote -x
*** Creating network
*** Adding controller
Unable to contact the remote controller at 127.0.0.1:6633
*** Adding hosts:
h1 h2
*** Adding switches:
s1
*** Adding links:
(h1, s1) (h2, s1)
*** Configuring hosts
h1 h2
*** Running terms on localhost:10.0
*** Starting controller
*** Starting 1 switches
s1
*** Starting CLI:
mininet>
또한 컨트롤러의 xterm을 다시 시작해야합니다.
mininet> xterm c0
mininet>
다음으로, 스위치에서 사용하는 OpenFlow 버전을 1.3으로 설정합니다. 또한 OVSDB에 액세스를 하기 위해 6632 포트로 수신하도록 설정합니다.
switch: s1 (root):
root@ryu-vm:~# ovs-vsctl set Bridge s1 protocols=OpenFlow13
root@ryu-vm:~# ovs-vsctl set-manager ptcp:6632
이어 「 스위칭 허브 」에서 사용했던 simple_switch_13.py 파일을 수정합니다. rest_qos.py 플로우 테이블의 파이프 라인에서 처리되는 것을 고려하고 있기 때문에 simple_switch_13.py의 플로우 항목을 table id:1에 등록하도록 변경합니다.
controller: c0 (root)
root@ryu-vm:~# sed '/OFPFlowMod(/,/)/s/)/, table_id=1)/' ryu/ryu/app/simple_switch_13.py > ryu/ryu/app/qos_simple_switch_13.py
root@ryu-vm:~# cd ryu/; python ./setup.py install
마지막으로, 컨트롤러 xterm에서 rest_qos, qos_simple_switch_13, rest_conf_switch를 시작합니다.
controller: c0 (root):
root@mininet-vm:~/ryu# ryu-manager ryu.app.rest_qos ryu.app.qos_simple_switch_13 ryu.app.rest_conf_switch
loading app ryu.app.rest_qos
loading app ryu.app.qos_simple_switch_13
loading app ryu.app.rest_conf_switch
loading app ryu.controller.ofp_handler
loading app ryu.controller.ofp_handler
loading app ryu.controller.ofp_handler
instantiating app None of DPSet
creating context dpset
instantiating app None of ConfSwitchSet
creating context conf_switch
creating context wsgi
instantiating app ryu.app.rest_conf_switch of ConfSwitchAPI
instantiating app ryu.app.qos_simple_switch_13 of SimpleSwitch13
instantiating app ryu.controller.ofp_handler of OFPHandler
instantiating app ryu.app.rest_qos of RestQoSAPI
(3519) wsgi starting up on http://0.0.0.0:8080/
Ryu와 스위치 사이에 연결이 성공하면 다음 메시지가 표시됩니다.
controller: c0 (root):
[QoS][INFO] dpid=0000000000000001: Join qos switch.
위 로그가 표시되면 준비 완료입니다.
Queue 설정
스위치 Queue를 설정합니다.
| 큐 ID | 최대 속도 | 최소 속도 |
|---|---|---|
| 0 | 500Kbps | - |
| 1 | (1Mbps) | 800Kbps |
주석
이후의 설명에서 사용하는 REST API의 자세한 내용은 장 끝 부분의 「 REST API 목록 」을 참조하십시오.
우선, OVSDB에 액세스하기 위한 설정을 합니다.
Node: c0 (root):
root@ryu-vm:~# curl -X PUT -d '"tcp:127.0.0.1:6632"' http://localhost:8080/v1.0/conf/switches/0000000000000001/ovsdb_addr
root@ryu-vm:~#
다음으로, Queue를 설정합니다.
root@ryu-vm:~# curl -X POST -d '{"port_name": "s1-eth1", "type": "linux-htb", "max_rate": "1000000", "queues": [{"max_rate": "500000"}, {"min_rate": "800000"}]}' http://localhost:8080/qos/queue/0000000000000001
  [
    {
      "switch_id": "0000000000000001",
      "command_result": {
        "result": "success",
        "details": {
          "0": {
            "config": {
              "max-rate": "500000"
            }
          },
          "1": {
            "config": {
              "min-rate": "800000"
            }
          }
        }
      }
    }
  ]
주석
REST 명령의 실행 결과는 보기 쉽도록 포맷화하였습니다.
QoS 설정
다음과 같이 스위치에 플로우를 설정합니다.
| (우선 순위) | 대상 | 대상 포트 | 프로토콜 | Queue ID | (QoS ID) |
|---|---|---|---|---|---|
| 1 | 10.0.0.1 | 5002 | UDP | 1 | 1 |
Node: c0 (root):
root@ryu-vm:~# curl -X POST -d '{"match": {"nw_dst": "10.0.0.1", "nw_proto": "UDP", "tp_dst": "5002"}, "actions":{"queue": "1"}}' http://localhost:8080/qos/rules/0000000000000001
  [
    {
      "switch_id": "0000000000000001",
      "command_result": [
        {
          "result": "success",
          "details": "QoS added. : qos_id=1"
        }
      ]
    }
  ]
설정 내용 확인
각 스위치에 설정된 내용을 확인합니다.
Node: c0 (root):
root@ryu-vm:~# curl -X GET http://localhost:8080/qos/rules/0000000000000001
  [
    {
      "switch_id": "0000000000000001",
      "command_result": [
        {
          "qos": [
            {
              "priority": 1,
              "dl_type": "IPv4",
              "nw_proto": "UDP",
              "tp_dst": 5002,
              "qos_id": 1,
              "nw_dst": "10.0.0.1",
              "actions": [
                {
                  "queue": "1"
                }
              ]
            }
          ]
        }
      ]
    }
  ]
대역폭 측정
이 상태에서 iperf 대역 측정을 해 봅니다. h1 서버에서는 UDP 프로토콜로 5001 포트와 5002 포트에서 수신 대기합니다. h2는 클라이언트로, h1의 5001 포트에 1Mbps의 UDP 트래픽 및 h1의 5002 포트에 1Mbps의 UDP 트래픽을 전달합니다.
주석
다음 예제에서는 대역 측정에 iperf (http://iperf.fr/)를 사용합니다. iperf 설치 및 사용 방법은 이 글에서는 설명하지 않습니다.
먼저 h1, h2 터미널을 하나씩 시작합니다.
mininet> xterm h1
mininet> xterm h2
Node: h1(1) (root):
root@ryu-vm:~# iperf -s -u -i 1 -p 5001
...
Node: h1(2) (root):
root@ryu-vm:~# iperf -s -u -i 1 -p 5002
...
Node: h2(1) (root):
root@ryu-vm:~# iperf -c 10.0.0.1 -p 5001 -u -b 1M
...
Node: h2(2) (root):
root@ryu-vm:~# iperf -c 10.0.0.1 -p 5002 -u -b 1M
...
Node: h1(1) (root):
[  4] local 10.0.0.1 port 5001 connected with 10.0.0.2 port 50375
[ ID] Interval       Transfer     Bandwidth        Jitter   Lost/Total Datagrams
[  4]  0.0- 1.0 sec  60.3 KBytes   494 Kbits/sec  12.208 ms    4/   42 (9.5%)
[  4]  0.0- 1.0 sec  4 datagrams received out-of-order
[  4]  1.0- 2.0 sec  58.9 KBytes   482 Kbits/sec  12.538 ms    0/   41 (0%)
[  4]  2.0- 3.0 sec  58.9 KBytes   482 Kbits/sec  12.494 ms    0/   41 (0%)
[  4]  3.0- 4.0 sec  58.9 KBytes   482 Kbits/sec  12.625 ms    0/   41 (0%)
[  4]  4.0- 5.0 sec  58.9 KBytes   482 Kbits/sec  12.576 ms    0/   41 (0%)
[  4]  5.0- 6.0 sec  58.9 KBytes   482 Kbits/sec  12.561 ms    0/   41 (0%)
[  4]  6.0- 7.0 sec  11.5 KBytes  94.1 Kbits/sec  45.536 ms    0/    8 (0%)
[  4]  7.0- 8.0 sec  4.31 KBytes  35.3 Kbits/sec  92.790 ms    0/    3 (0%)
[  4]  8.0- 9.0 sec  4.31 KBytes  35.3 Kbits/sec  135.391 ms    0/    3 (0%)
[  4]  9.0-10.0 sec  4.31 KBytes  35.3 Kbits/sec  167.045 ms    0/    3 (0%)
[  4] 10.0-11.0 sec  4.31 KBytes  35.3 Kbits/sec  193.006 ms    0/    3 (0%)
[  4] 11.0-12.0 sec  4.31 KBytes  35.3 Kbits/sec  213.944 ms    0/    3 (0%)
[  4] 12.0-13.0 sec  4.31 KBytes  35.3 Kbits/sec  231.981 ms    0/    3 (0%)
[  4] 13.0-14.0 sec  4.31 KBytes  35.3 Kbits/sec  249.758 ms    0/    3 (0%)
[  4] 14.0-15.0 sec  4.31 KBytes  35.3 Kbits/sec  261.139 ms    0/    3 (0%)
[  4] 15.0-16.0 sec  4.31 KBytes  35.3 Kbits/sec  269.879 ms    0/    3 (0%)
[  4] 16.0-17.0 sec  12.9 KBytes   106 Kbits/sec  204.755 ms    0/    9 (0%)
[  4] 17.0-18.0 sec  58.9 KBytes   482 Kbits/sec  26.214 ms    0/   41 (0%)
[  4] 18.0-19.0 sec  58.9 KBytes   482 Kbits/sec  13.485 ms    0/   41 (0%)
[  4] 19.0-20.0 sec  58.9 KBytes   482 Kbits/sec  12.690 ms    0/   41 (0%)
[  4] 20.0-21.0 sec  58.9 KBytes   482 Kbits/sec  12.498 ms    0/   41 (0%)
[  4] 21.0-22.0 sec  58.9 KBytes   482 Kbits/sec  12.601 ms    0/   41 (0%)
[  4] 22.0-23.0 sec  60.3 KBytes   494 Kbits/sec  12.640 ms    0/   42 (0%)
[  4] 23.0-24.0 sec  58.9 KBytes   482 Kbits/sec  12.508 ms    0/   41 (0%)
[  4] 24.0-25.0 sec  58.9 KBytes   482 Kbits/sec  12.578 ms    0/   41 (0%)
[  4] 25.0-26.0 sec  58.9 KBytes   482 Kbits/sec  12.541 ms    0/   41 (0%)
[  4] 26.0-27.0 sec  58.9 KBytes   482 Kbits/sec  12.539 ms    0/   41 (0%)
[  4] 27.0-28.0 sec  58.9 KBytes   482 Kbits/sec  12.578 ms    0/   41 (0%)
[  4] 28.0-29.0 sec  58.9 KBytes   482 Kbits/sec  12.527 ms    0/   41 (0%)
[  4] 29.0-30.0 sec  58.9 KBytes   482 Kbits/sec  12.542 ms    0/   41 (0%)
[  4]  0.0-30.6 sec  1.19 MBytes   327 Kbits/sec  12.562 ms    4/  852 (0.47%)
[  4]  0.0-30.6 sec  4 datagrams received out-of-order
Node: h1(2) (root):
[  4] local 10.0.0.1 port 5002 connected with 10.0.0.2 port 60868
[ ID] Interval       Transfer     Bandwidth        Jitter   Lost/Total Datagrams
[  4]  0.0- 1.0 sec   112 KBytes   917 Kbits/sec   4.288 ms    0/   78 (0%)
[  4]  1.0- 2.0 sec   115 KBytes   941 Kbits/sec   4.168 ms    0/   80 (0%)
[  4]  2.0- 3.0 sec   115 KBytes   941 Kbits/sec   4.454 ms    0/   80 (0%)
[  4]  3.0- 4.0 sec   113 KBytes   929 Kbits/sec   4.226 ms    0/   79 (0%)
[  4]  4.0- 5.0 sec   113 KBytes   929 Kbits/sec   4.096 ms    0/   79 (0%)
[  4]  5.0- 6.0 sec   113 KBytes   929 Kbits/sec   4.225 ms    0/   79 (0%)
[  4]  6.0- 7.0 sec   113 KBytes   929 Kbits/sec   4.055 ms    0/   79 (0%)
[  4]  7.0- 8.0 sec   113 KBytes   929 Kbits/sec   4.241 ms    0/   79 (0%)
[  4]  8.0- 9.0 sec   115 KBytes   941 Kbits/sec   3.886 ms    0/   80 (0%)
[  4]  9.0-10.0 sec   112 KBytes   917 Kbits/sec   3.969 ms    0/   78 (0%)
[  4]  0.0-10.8 sec  1.19 MBytes   931 Kbits/sec   4.287 ms    0/  852 (0%)
결과에서 보는 바와 같이, 5001번 포트로 향하는 트래픽은 대역폭 제한으로 인해 500Kbps 이하로 형성되고, 5002번 포트로 향하는 트래픽은 800kbps의 대역폭 보장이 이루어짐을 알 수 있습니다.
DiffServ의 QoS의 동작 예제
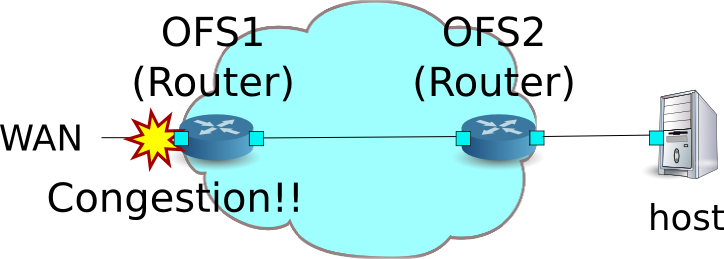
앞의 예제에서는 플로우마다 QoS를 생성하여 상세한 제어가 가능한 반면, 처리하는 플로우가 많아질수록 대역폭을 제어하는 스위치에 플로우가 증가하여 확장성이 없습니다. 해당 플로우에 QoS를 처리하는 대신, DiffServ 도메인의 입구 라우터에서 플로우를 여러 클래스로 나누어 각 클래스마다 제어를 하는 DiffServ를 적용합니다. DiffServ는 IP 헤더의 ToS 필드에 6 비트 DSCP 값을 사용하여 DSCP 값에 의해 정의되는 PHB에 따라 전송하도록 QoS를 제공합니다.
다음과 같은 토폴로지를 가정하고 스위치 (라우터) OFS1에 Queue 및 클래스에 대한 대역폭 제어를 설정하고, 라우터 OFS2는 플로우에 따라 DSCP 값을 표시하도록 규칙을 적용하는 예제를 소개합니다. 또한, OFS1의 WAN 쪽 인터페이스에서 트래픽 쉐이핑을 사용하는 경우를 가정합니다.
환경 구축
우선 Mininet에 환경을 구축합니다. mn 명령의 매개 변수는 다음과 같습니다.
| 매개 변수 | 값 | 설명 |
|---|---|---|
| topo | linear,2 | 2개의 스위치가 일렬로 연결된 토폴로지 |
| mac | 없음 | 자동으로 호스트의 MAC 주소를 설정 |
| switch | ovsk | Open vSwitch를 사용 |
| controller | remote | 외부 OpenFlow 컨트롤러 이용 |
| x | 없음 | xterm을 시작 |
실행 예는 다음과 같습니다.
ryu@ryu-vm:~$ sudo mn --topo linear,2 --mac --switch ovsk --controller remote -x
*** Creating network
*** Adding controller
Unable to contact the remote controller at 127.0.0.1:6633
*** Adding hosts:
h1 h2
*** Adding switches:
s1
*** Adding links:
(h1, s1) (h2, s1)
*** Configuring hosts
h1 h2
*** Running terms on localhost:10.0
*** Starting controller
*** Starting 1 switches
s1
*** Starting CLI:
mininet>
또한, 컨트롤러의 xterm도 시작합니다.
mininet> xterm c0
mininet>
이어 스위치에서 사용하는 OpenFlow 버전을 1.3으로 설정합니다. 또한 OVSDB에 액세스하기 위해 6632 포트로 수신하도록 설정합니다.
switch: s1 (root):
root@ryu-vm:~# ovs-vsctl set Bridge s1 protocols=OpenFlow13
root@ryu-vm:~# ovs-vsctl set-manager ptcp:6632
switch: s2 (root):
root@ryu-vm:~# ovs-vsctl set Bridge s2 protocols=OpenFlow13
그 다음, 각 호스트에서 자동으로 할당된 IP 주소를 삭제하고 새로운 IP 주소를 설정합니다.
host: h1:
root@ryu-vm:~# ip addr del 10.0.0.1/8 dev h1-eth0
root@ryu-vm:~# ip addr add 172.16.20.10/24 dev h1-eth0
host: h2:
root@ryu-vm:~# ip addr del 10.0.0.2/8 dev h2-eth0
root@ryu-vm:~# ip addr add 172.16.10.10/24 dev h2-eth0
계속해서, 「 라우터 」 에서 사용한 rest_router.py를 수정합니다. rest_qos.py에서는 플로우 테이블의 파이프라인에서 처리된다고 가정하고 있기에, rest_router.py의 플로우 항목을 table id:1에 등록하도록 변경합니다.
controller: c0 (root):
root@ryu-vm:~# sed '/OFPFlowMod(/,/)/s/0, cmd/1, cmd/' ryu/ryu/app/rest_router.py > ryu/ryu/app/qos_rest_router.py
root@ryu-vm:~# cd ryu/; python ./setup.py install
마지막으로, 컨트롤러 xterm에서 rest_qos, qos_rest_router, rest_conf_switch을 시작합니다.
controller: c0 (root):
root@mininet-vm:~/ryu# ryu-manager ryu.app.rest_qos ryu.app.qos_rest_router ryu.app.rest_conf_switch
loading app ryu.app.rest_qos
loading app ryu.app.qos_rest_router
loading app ryu.app.rest_conf_switch
loading app ryu.controller.ofp_handler
loading app ryu.controller.ofp_handler
loading app ryu.controller.ofp_handler
loading app ryu.controller.ofp_handler
instantiating app None of DPSet
creating context dpset
instantiating app None of ConfSwitchSet
creating context conf_switch
creating context wsgi
instantiating app ryu.app.rest_conf_switch of ConfSwitchAPI
instantiating app ryu.app.qos_rest_router of RestRouterAPI
instantiating app ryu.controller.ofp_handler of OFPHandler
instantiating app ryu.app.rest_qos of RestQoSAPI
(4687) wsgi starting up on http://0.0.0.0:8080/
Ryu와 스위치 간의 연결에 성공하면 다음 메시지가 표시됩니다.
controller: c0 (root):
[RT][INFO] switch_id=0000000000000002: Set SW config for TTL error packet in.
[RT][INFO] switch_id=0000000000000002: Set ARP handling (packet in) flow [cookie=0x0]
[RT][INFO] switch_id=0000000000000002: Set L2 switching (normal) flow [cookie=0x0]
[RT][INFO] switch_id=0000000000000002: Set default route (drop) flow [cookie=0x0]
[RT][INFO] switch_id=0000000000000002: Start cyclic routing table update.
[RT][INFO] switch_id=0000000000000002: Join as router.
[QoS][INFO] dpid=0000000000000002: Join qos switch.
[RT][INFO] switch_id=0000000000000001: Set SW config for TTL error packet in.
[RT][INFO] switch_id=0000000000000001: Set ARP handling (packet in) flow [cookie=0x0]
[RT][INFO] switch_id=0000000000000001: Set L2 switching (normal) flow [cookie=0x0]
[RT][INFO] switch_id=0000000000000001: Set default route (drop) flow [cookie=0x0]
[RT][INFO] switch_id=0000000000000001: Start cyclic routing table update.
[RT][INFO] switch_id=0000000000000001: Join as router.
[QoS][INFO] dpid=0000000000000001: Join qos switch.
위 로그가 표시되면 준비가 완료된 것입니다.
Queue 설정
| 큐 ID | 최대 속도 | 최소 속도 | 클래스 |
|---|---|---|---|
| 0 | 1Mbps | - | Default |
| 1 | (1Mbps) | 200Kbps | AF3 |
| 2 | (1Mbps) | 500Kbps | AF4 |
주석
이후의 설명에서 사용하는 REST API의 자세한 내용은 장 끝부분의 「 REST API 목록 」을 참조하십시오.
우선, OVSDB에 액세스하기위한 설정을 합니다.
Node: c0 (root):
root@ryu-vm:~# curl -X PUT -d '"tcp:127.0.0.1:6632"' http://localhost:8080/v1.0/conf/switches/0000000000000001/ovsdb_addr
root@ryu-vm:~#
이어, Queue를 설정합니다.
root@ryu-vm:~# curl -X POST -d '{"port_name": "s1-eth1", "type": "linux-htb", "max_rate": "1000000", "queues":[{"max_rate": "1000000"}, {"min_rate": "200000"}, {"min_rate": "500000"}]}' http://localhost:8080/qos/queue/0000000000000001
  [
    {
      "switch_id": "0000000000000001",
      "command_result": {
        "result": "success",
        "details": {
          "0": {
            "config": {
              "max-rate": "1000000"
            }
          },
          "1": {
            "config": {
              "min-rate": "200000"
            }
          },
          "2": {
            "config": {
              "min-rate": "500000"
            }
          }
        }
      }
    }
  ]
주석
REST 명령의 실행 결과는 보기 쉽도록 포맷화하였습니다.
라우터 설정
각 라우터에 주소, 기본 경로를 설정합니다.
root@ryu-vm:~# curl -X POST -d '{"address": "172.16.20.1/24"}' http://localhost:8080/router/0000000000000001
  [
    {
      "switch_id": "0000000000000001",
      "command_result": [
        {
          "result": "success",
          "details": "Add address [address_id=1]"
        }
      ]
    }
  ]

root@ryu-vm:~# curl -X POST -d '{"address": "172.16.30.10/24"}' http://localhost:8080/router/0000000000000001
  [
    {
      "switch_id": "0000000000000001",
      "command_result": [
        {
          "result": "success",
          "details": "Add address [address_id=2]"
        }
      ]
    }
  ]

root@ryu-vm:~# curl -X POST -d '{"gateway": "172.16.30.1"}' http://localhost:8080/router/0000000000000001
  [
    {
      "switch_id": "0000000000000001",
      "command_result": [
        {
          "result": "success",
          "details": "Add route [route_id=1]"
        }
      ]
    }
  ]

root@ryu-vm:~# curl -X POST -d '{"address": "172.16.10.1/24"}' http://localhost:8080/router/0000000000000002
  [
    {
      "switch_id": "0000000000000002",
      "command_result": [
        {
          "result": "success",
          "details": "Add address [address_id=1]"
        }
      ]
    }
  ]

root@ryu-vm:~# curl -X POST -d '{"address": "172.16.30.1/24"}' http://localhost:8080/router/0000000000000002
  [
    {
      "switch_id": "0000000000000002",
      "command_result": [
        {
          "result": "success",
          "details": "Add address [address_id=2]"
        }
      ]
    }
  ]

root@ryu-vm:~# curl -X POST -d '{"gateway": "172.16.30.10"}' http://localhost:8080/router/0000000000000002
  [
    {
      "switch_id": "0000000000000002",
      "command_result": [
        {
          "result": "success",
          "details": "Add route [route_id=1]"
        }
      ]
    }
  ]
...
라우터에 IP 주소를 구성할 수 있으므로 각 호스트에 기본 게이트웨이를 등록합니다.
host: h1:
root@ryu-vm:~# ip route add default via 172.16.20.1
host: h2:
root@ryu-vm:~# ip route add default via 172.16.10.1
QoS 설정
다음 라우터 (s1)에 DSCP 값에 따른 제어 플로우를 설정합니다.
| (우선 순위) | DSCP | 대기열 ID | (QoS ID) |
|---|---|---|---|
| 1 | 26(AF31) | 1 | 1 |
| 1 | 34(AF41) | 2 | 2 |
Node: c0 (root):
root@ryu-vm:~# curl -X POST -d '{"match": {"ip_dscp": "26"}, "actions":{"queue": "1"}}' http://localhost:8080/qos/rules/0000000000000001
  [
    {
      "switch_id": "0000000000000001",
      "command_result": [
        {
          "result": "success",
          "details": "QoS added. : qos_id=1"
        }
      ]
    }
  ]

root@ryu-vm:~# curl -X POST -d '{"match": {"ip_dscp": "34"}, "actions":{"queue": "2"}}' http://localhost:8080/qos/rules/0000000000000001
  [
    {
      "switch_id": "0000000000000001",
      "command_result": [
        {
          "result": "success",
          "details": "QoS added. : qos_id=2"
        }
      ]
    }
  ]
다음 라우터 (s2)에 마킹하는 플로우를 설정합니다.
| (우선 순위) | 대상 | 대상 포트 | 프로토콜 | DSCP | (QoS ID) |
|---|---|---|---|---|---|
| 1 | 172.16.20.10 | 5002 | UDP | 26(AF31) | 1 |
| 1 | 172.16.20.10 | 5003 | UDP | 34(AF41) | 2 |
Node: c0 (root):
root@ryu-vm:~# curl -X POST -d '{"match": {"nw_dst": "172.16.20.10", "nw_proto": "UDP", "tp_dst": "5002"}, "actions":{"mark": "26"}}' http://localhost:8080/qos/rules/0000000000000002
  [
    {
      "switch_id": "0000000000000002",
      "command_result": [
        {
          "result": "success",
          "details": "QoS added. : qos_id=1"
        }
      ]
    }
  ]

root@ryu-vm:~# curl -X POST -d '{"match": {"nw_dst": "172.16.20.10", "nw_proto": "UDP", "tp_dst": "5003"}, "actions":{"mark": "34"}}' http://localhost:8080/qos/rules/0000000000000002
  [
    {
      "switch_id": "0000000000000002",
      "command_result": [
        {
          "result": "success",
          "details": "QoS added. : qos_id=2"
        }
      ]
    }
  ]
설정 내용 확인
각 스위치에 설정된 내용을 확인합니다.
Node: c0 (root):
root@ryu-vm:~# curl -X GET http://localhost:8080/qos/rules/0000000000000001
  [
    {
      "switch_id": "0000000000000001",
      "command_result": [
        {
          "qos": [
            {
              "priority": 1,
              "dl_type": "IPv4",
              "ip_dscp": 34,
              "actions": [
                {
                  "queue": "2"
                }
              ],
              "qos_id": 2
            },
            {
              "priority": 1,
              "dl_type": "IPv4",
              "ip_dscp": 26,
              "actions": [
                {
                  "queue": "1"
                }
              ],
              "qos_id": 1
            }
          ]
        }
      ]
    }
  ]

root@ryu-vm:~# curl -X GET http://localhost:8080/qos/rules/0000000000000002
  [
    {
      "switch_id": "0000000000000002",
      "command_result": [
        {
          "qos": [
            {
              "priority": 1,
              "dl_type": "IPv4",
              "nw_proto": "UDP",
              "tp_dst": 5002,
              "qos_id": 1,
              "nw_dst": "172.16.20.10",
              "actions": [
                {
                  "mark": "26"
                }
              ]
            },
            {
              "priority": 1,
              "dl_type": "IPv4",
              "nw_proto": "UDP",
              "tp_dst": 5003,
              "qos_id": 2,
              "nw_dst": "172.16.20.10",
              "actions": [
                {
                  "mark": "34"
                }
              ]
            }
          ]
        }
      ]
    }
  ]
대역폭 측정
이 상태에서 iperf 대역 측정을 합니다. h1 서버에서는 UDP 프로토콜로 포트 번호 5001, 5002, 5003에서 수신 대기합니다. h2 클라이언트에서는 h1 5001 포트로 1Mbps의 UDP 트래픽을, h1 5002 포트로 300Kbps UDP 트래픽을, 그리고 h1 5003 포트로 600Kbps UDP 트래픽을 전송합니다.
먼저, h2 터미널을 시작합니다.
mininet> xterm h2
mininet> xterm h2
Node: h1(1) (root):
root@ryu-vm:~# iperf -s -u -p 5002 &
...
root@ryu-vm:~# iperf -s -u -p 5003 &
...
root@ryu-vm:~# iperf -s -u -i 1 5001
------------------------------------------------------------
Server listening on UDP port 5001
Receiving 1470 byte datagrams
UDP buffer size:  208 KByte (default)
------------------------------------------------------------
Node: h2(1) (root):
root@ryu-vm:~# iperf -c 172.16.20.10 -p 5001 -u -b 1M
...
Node: h2(2) (root):
root@ryu-vm:~# iperf -c 172.16.20.10 -p 5002 -u -b 300K
------------------------------------------------------------
Client connecting to 172.16.20.10, UDP port 5002
Sending 1470 byte datagrams
UDP buffer size:  208 KByte (default)
------------------------------------------------------------
[  4] local 172.16.10.10 port 44077 connected with 172.16.20.10 port 5002
[ ID] Interval       Transfer     Bandwidth
[  4]  0.0-10.1 sec   369 KBytes   300 Kbits/sec
[  4] Sent 257 datagrams
[  4] Server Report:
[  4]  0.0-10.2 sec   369 KBytes   295 Kbits/sec  17.379 ms    0/  257 (0%)
Node: h2(3) (root):
root@ryu-vm:~# iperf -c 172.16.20.10 -p 5003 -u -b 600K
------------------------------------------------------------
Client connecting to 172.16.20.10, UDP port 5003
Sending 1470 byte datagrams
UDP buffer size:  208 KByte (default)
------------------------------------------------------------
[  4] local 172.16.10.10 port 59280 connected with 172.16.20.10 port 5003
[ ID] Interval       Transfer     Bandwidth
[  4]  0.0-10.0 sec   735 KBytes   600 Kbits/sec
[  4] Sent 512 datagrams
[  4] Server Report:
[  4]  0.0-10.0 sec   735 KBytes   600 Kbits/sec   5.401 ms    0/  512 (0%)
Node: h1(1) (root):
[  4] local 172.16.20.10 port 5001 connected with 172.16.10.10 port 37329
[ ID] Interval       Transfer     Bandwidth        Jitter   Lost/Total Datagrams
[  4]  0.0- 1.0 sec   119 KBytes   976 Kbits/sec   0.639 ms    0/   83 (0%)
[  4]  1.0- 2.0 sec   118 KBytes   964 Kbits/sec   0.680 ms    0/   82 (0%)
[  4]  2.0- 3.0 sec  87.6 KBytes   717 Kbits/sec   5.817 ms    0/   61 (0%)
[  4]  3.0- 4.0 sec  81.8 KBytes   670 Kbits/sec   5.700 ms    0/   57 (0%)
[  4]  4.0- 5.0 sec  66.0 KBytes   541 Kbits/sec  12.772 ms    0/   46 (0%)
[  4]  5.0- 6.0 sec  8.61 KBytes  70.6 Kbits/sec  60.590 ms    0/    6 (0%)
[  4]  6.0- 7.0 sec  8.61 KBytes  70.6 Kbits/sec  89.968 ms    0/    6 (0%)
[  4]  7.0- 8.0 sec  8.61 KBytes  70.6 Kbits/sec  108.364 ms    0/    6 (0%)
[  4]  8.0- 9.0 sec  10.0 KBytes  82.3 Kbits/sec  125.635 ms    0/    7 (0%)
[  4]  9.0-10.0 sec  8.61 KBytes  70.6 Kbits/sec  130.604 ms    0/    6 (0%)
[  4] 10.0-11.0 sec  8.61 KBytes  70.6 Kbits/sec  140.192 ms    0/    6 (0%)
[  4] 11.0-12.0 sec  8.61 KBytes  70.6 Kbits/sec  144.411 ms    0/    6 (0%)
[  4] 12.0-13.0 sec  28.7 KBytes   235 Kbits/sec  63.964 ms    0/   20 (0%)
[  4] 13.0-14.0 sec  44.5 KBytes   365 Kbits/sec  26.721 ms    0/   31 (0%)
[  4] 14.0-15.0 sec  57.4 KBytes   470 Kbits/sec   9.396 ms    0/   40 (0%)
[  4] 15.0-16.0 sec   118 KBytes   964 Kbits/sec   0.956 ms    0/   82 (0%)
[  4] 16.0-17.0 sec   119 KBytes   976 Kbits/sec   0.820 ms    0/   83 (0%)
[  4] 17.0-18.0 sec   118 KBytes   964 Kbits/sec   0.741 ms    0/   82 (0%)
[  4] 18.0-19.0 sec   118 KBytes   964 Kbits/sec   0.839 ms    0/   82 (0%)
[  4]  0.0-19.7 sec  1.19 MBytes   508 Kbits/sec   0.981 ms    0/  852 (0%)
AF41로 마킹된 트래픽은 500Kbps의 대역폭이 보장되고, AF31로 마킹된 트래픽은 200Kbps의 대역폭이 보장됩니다. 한편, Best-effort 트래픽은 AF에 표시되는 트래픽이 흐르는 동안 대역폭이 감소함을 알 수 있습니다. 이와 같이 DiffServ 의해 QoS가 제공되는지 확인할 수 있었습니다.
Meter Table을 사용한 QoS의 동작 예
OpenFlow 1.3에서 Meter Table이 도입되어, OpenFlow에서 트래픽 폴리싱이 가능해졌습니다. 여기서는 Meter Table 사용 예를 소개합니다. 이 예제에서는 Meter Table을 지원하는 OpenFlow Switch인 ofsoftswitch13(https://github.com/CPqD/ofsoftswitch13)을 사용합니다.
주석
ofsoftswitch13의 설치 절차 등에 대해서는 여기서 다루지 않습니다. 참고: (https://github.com/CPqD/ofsoftswitch13/wiki/OpenFlow-1.3-Tutorial)
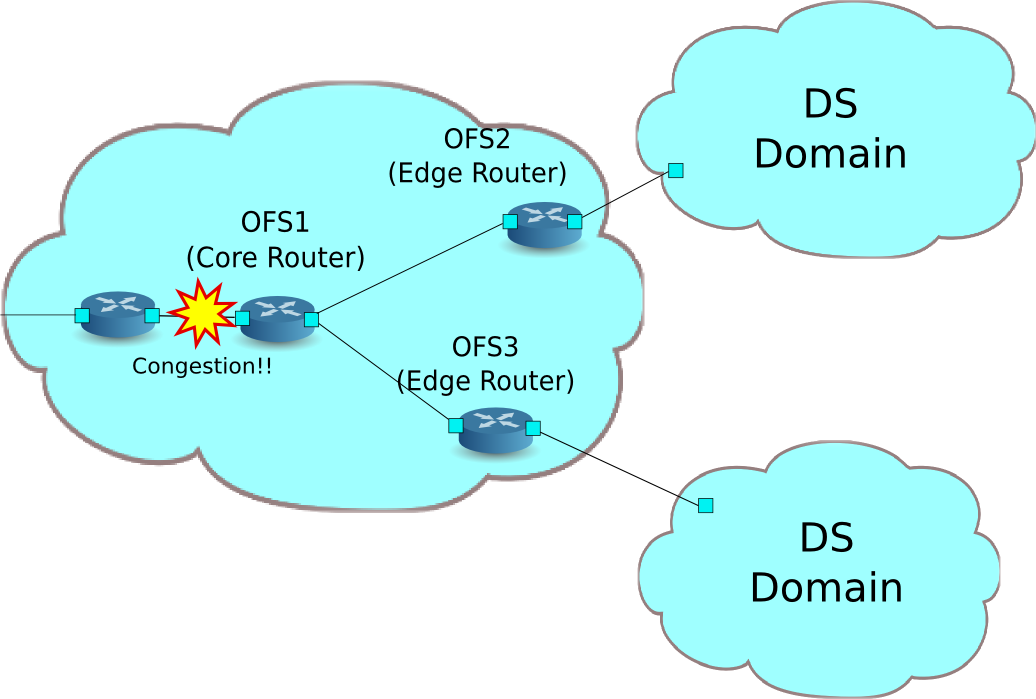
다음과 같이 여러 DiffServ 도메인 (DS 도메인)으로 구성된 네트워크를 가정합니다. DS 도메인의 경계에 위치하는 라우터 (에지 라우터)에 의해 계량이 이루어 지정된 대역폭을 초과하는 트래픽은 다시 표시됩니다. 보통, 다시 마킹된 패킷은 우선적으로 삭제 되거나 우선 순위가 낮은 클래스로 처리됩니다. 예를 들어, AF1 클래스에 800Kbps의 대역폭을 보증하고 각 DS 도메인에서 유입되는 AF11 트래픽을 400Kbps로 대역폭을 지정하면, 그 이상은 초과 트래픽으로 패킷 AF12에 다시 표시됩니다. 그러나 이 때, AF12은 Best-effort 트래픽으로 보장되도록 설정합니다.
환경 구축
우선 Mininet으로 환경을 구축합니다. Python 스크립트로 토폴로지를 생성합니다.
소스 이름: qos_sample_topology.py
from mininet.net import Mininet
from mininet.cli import CLI
from mininet.topo import Topo
from mininet.node import UserSwitch
from mininet.node import RemoteController

class SliceableSwitch(UserSwitch):
    def __init__(self, name, **kwargs):
        UserSwitch.__init__(self, name, '', **kwargs)

class MyTopo(Topo):
    def __init__( self ):
        "Create custom topo."
        # Initialize topology
        Topo.__init__( self )
        # Add hosts and switches
        host01 = self.addHost('h1')
        host02 = self.addHost('h2')
        host03 = self.addHost('h3')
        switch01 = self.addSwitch('s1')
        switch02 = self.addSwitch('s2')
        switch03 = self.addSwitch('s3')
        # Add links
        self.addLink(host01, switch01)
        self.addLink(host02, switch02)
        self.addLink(host03, switch03)
        self.addLink(switch01, switch02)
        self.addLink(switch01, switch03)

def run(net):
    s1 = net.getNodeByName('s1')
    s1.cmdPrint('dpctl unix:/tmp/s1 queue-mod 1 1 80')
    s1.cmdPrint('dpctl unix:/tmp/s1 queue-mod 1 2 120')
    s1.cmdPrint('dpctl unix:/tmp/s1 queue-mod 1 3 800')

def genericTest(topo):
    net = Mininet(topo=topo, switch=SliceableSwitch,
        controller=RemoteController)
    net.start()
    run(net)
    CLI(net)
    net.stop()

def main():
    topo = MyTopo()
    genericTest(topo)

if __name__ == '__main__':
    main()
주석
미리 ofsoftswitch13 링크 속도를 1Mbps로 변경합니다.
먼저, ofsoftswitch13의 소스 코드를 수정합니다.
$ cd ofsoftswitch13
$ gedit lib/netdev.c
lib/netdev.c:
644           if (ecmd.autoneg) {
645               netdev->curr |= OFPPF_AUTONEG;
646           }
647
648 -         netdev->speed = ecmd.speed;
649 +         netdev->speed = 1;  /* Fix to 1Mbps link */
650
651       } else {
652           VLOG_DBG(LOG_MODULE, "ioctl(SIOCETHTOOL) failed: %s", strerror(errno));
653       }
그리고 ofsoftswitch13를 다시 설치합니다.
$ make clean
$ ./boot.sh
$ ./configure
$ make
$ sudo make install
실행 예는 다음과 같습니다.
mininet@mininet-vm:~$ sudo python qos_sample_topology.py
Unable to contact the remote controller at 127.0.0.1:6633
mininet>
또한 컨트롤로의 xterm을 실행해야 합니다.
mininet> xterm c0
mininet> xterm c0
mininet>
이어, 「 스위칭 허브 」에서 사용했던 simple_switch_13.py을 변경합니다. rest_qos.py에서는 플로우 테이블의 파이프라인에서 처리된다고 가정하기에, simple_switch_13.py의 플로우 항목을 table id:1에 등록하도록 변경합니다.
controller: c0 (root)
root@ryu-vm:~# sed '/OFPFlowMod(/,/)/s/)/, table_id=1)/' ryu/ryu/app/simple_switch_13.py > ryu/ryu/app/qos_simple_switch_13.py
root@ryu-vm:~# cd ryu/; python ./setup.py install
마지막으로, 컨트롤러 xterm에서 rest_qos, qos_simple_switch_13을 시작합니다.
controller: c0 (root):
root@mininet-vm:~/ryu# ryu-manager ryu.app.rest_qos ryu.app.qos_simple_switch_13
loading app ryu.app.rest_qos
loading app ryu.app.qos_simple_switch_13
loading app ryu.controller.ofp_handler
loading app ryu.controller.ofp_handler
loading app ryu.controller.ofp_handler
instantiating app None of DPSet
creating context dpset
instantiating app None of ConfSwitchSet
creating context conf_switch
creating context wsgi
instantiating app ryu.app.qos_simple_switch_13 of SimpleSwitch13
instantiating app ryu.controller.ofp_handler of OFPHandler
instantiating app ryu.app.rest_qos of RestQoSAPI
(2348) wsgi starting up on http://0.0.0.0:8080/
Ryu와 스위치와의 연결에 성공하면 다음 메시지가 표시됩니다.
controller: c0 (root):
[QoS][INFO] dpid=0000000000000003: Join qos switch.
[QoS][INFO] dpid=0000000000000001: Join qos switch.
[QoS][INFO] dpid=0000000000000002: Join qos switch.
...
QoS 설정
다음과 같이 스위치 (s1)에 DSCP 값에 따라 제어 플로우를 설정합니다.
| (우선 순위) | DSCP | 큐 ID | (QoS ID) |
|---|---|---|---|
| 1 | 0 (BE) | 1 | 1 |
| 1 | 12(AF12) | 2 | 2 |
| 1 | 10(AF11) | 3 | 3 |
Node: c0 (root):
root@ryu-vm:~# curl -X POST -d '{"match": {"ip_dscp": "0", "in_port": "2"}, "actions":{"queue": "1"}}' http://localhost:8080/qos/rules/0000000000000001
  [
    {
      "switch_id": "0000000000000001",
      "command_result": [
        {
          "result": "success",
          "details": "QoS added. : qos_id=1"
        }
      ]
    }
  ]

root@ryu-vm:~# curl -X POST -d '{"match": {"ip_dscp": "10", "in_port": "2"}, "actions":{"queue": "3"}}' http://localhost:8080/qos/rules/0000000000000001
  [
    {
      "switch_id": "0000000000000001",
      "command_result": [
        {
          "result": "success",
          "details": "QoS added. : qos_id=2"
        }
      ]
    }
  ]

root@ryu-vm:~# curl -X POST -d '{"match": {"ip_dscp": "12", "in_port": "2"}, "actions":{"queue": "2"}}' http://localhost:8080/qos/rules/0000000000000001
  [
    {
      "switch_id": "0000000000000001",
      "command_result": [
        {
          "result": "success",
          "details": "QoS added. : qos_id=3"
        }
      ]
    }
  ]

root@ryu-vm:~# curl -X POST -d '{"match": {"ip_dscp": "0", "in_port": "3"}, "actions":{"queue": "1"}}' http://localhost:8080/qos/rules/0000000000000001
  [
    {
      "switch_id": "0000000000000001",
      "command_result": [
        {
          "result": "success",
          "details": "QoS added. : qos_id=4"
        }
      ]
    }
  ]

root@ryu-vm:~# curl -X POST -d '{"match": {"ip_dscp": "10", "in_port": "3"}, "actions":{"queue": "3"}}' http://localhost:8080/qos/rules/0000000000000001
  [
    {
      "switch_id": "0000000000000001",
      "command_result": [
        {
          "result": "success",
          "details": "QoS added. : qos_id=5"
        }
      ]
    }
  ]

root@ryu-vm:~# curl -X POST -d '{"match": {"ip_dscp": "12", "in_port": "3"}, "actions":{"queue": "2"}}' http://localhost:8080/qos/rules/0000000000000001
  [
    {
      "switch_id": "0000000000000001",
      "command_result": [
        {
          "result": "success",
          "details": "QoS added. : qos_id=6"
        }
      ]
    }
  ]
다음과 같이 스위치 (s2, s3)에 미터 항목을 설정합니다.
| (우선 순위) | DSCP | 미터 ID | (QoS ID) |
|---|---|---|---|
| 1 | 10(AF11) | 1 | 1 |
| 미터 ID | Flags | Bands |
|---|---|---|
| 1 | KBPS | type:DSCP_REMARK, rate:400000, prec_level:1 |
root@ryu-vm:~# curl -X POST -d '{"match": {"ip_dscp": "10"}, "actions":{"meter": "1"}}' http://localhost:8080/qos/rules/0000000000000002
  [
    {
      "switch_id": "0000000000000002",
      "command_result": [
        {
          "result": "success",
          "details": "QoS added. : qos_id=1"
        }
      ]
    }
  ]

root@ryu-vm:~# curl -X POST -d '{"meter_id": "1", "flags": "KBPS", "bands":[{"type":"DSCP_REMARK", "rate": "400", "prec_level": "1"}]}' http://localhost:8080/qos/meter/0000000000000002
  [
    {
      "switch_id": "0000000000000002",
      "command_result": [
        {
          "result": "success",
          "details": "Meter added. : Meter ID=1"
        }
      ]
    }
  ]

root@ryu-vm:~# curl -X POST -d '{"match": {"ip_dscp": "10"}, "actions":{"meter": "1"}}' http://localhost:8080/qos/rules/0000000000000003
[
  {
    "switch_id": "0000000000000003",
    "command_result": [
      {
        "result": "success",
        "details": "QoS added. : qos_id=1"
      }
    ]
  }
]

root@ryu-vm:~# curl -X POST -d '{"meter_id": "1", "flags": "KBPS", "bands":[{"type":"DSCP_REMARK", "rate": "400", "prec_level": "1"}]}' http://localhost:8080/qos/meter/0000000000000003
  [
    {
      "switch_id": "0000000000000003",
      "command_result": [
        {
          "result": "success",
          "details": "Meter added. : Meter ID=1"
        }
      ]
    }
  ]
설정 내용 확인
각 스위치에 설정된 내용을 확인합니다.
Node: c0 (root):
root@ryu-vm:~# curl -X GET http://localhost:8080/qos/rules/0000000000000001
  [
    {
      "switch_id": "0000000000000001",
      "command_result": [
        {
          "qos": [
            {
              "priority": 1,
              "dl_type": "IPv4",
              "actions": [
                {
                  "queue": "1"
                }
              ],
              "in_port": 2,
              "qos_id": 1
            },
            {
              "priority": 1,
              "dl_type": "IPv4",
              "actions": [
                {
                  "queue": "3"
                }
              ],
              "qos_id": 2,
              "in_port": 2,
              "ip_dscp": 10
            },
            {
              "priority": 1,
              "dl_type": "IPv4",
              "actions": [
                {
                  "queue": "2"
                }
              ],
              "qos_id": 3,
              "in_port": 2,
              "ip_dscp": 12
            },
            {
              "priority": 1,
              "dl_type": "IPv4",
              "actions": [
                {
                  "queue": "1"
                }
              ],
              "in_port": 3,
              "qos_id": 4
            },
            {
              "priority": 1,
              "dl_type": "IPv4",
              "actions": [
                {
                  "queue": "3"
                }
              ],
              "qos_id": 5,
              "in_port": 3,
              "ip_dscp": 10
            },
            {
              "priority": 1,
              "dl_type": "IPv4",
              "actions": [
                {
                  "queue": "2"
                }
              ],
              "qos_id": 6,
              "in_port": 3,
              "ip_dscp": 12
            }
          ]
        }
      ]
    }
  ]

root@ryu-vm:~# curl -X GET http://localhost:8080/qos/rules/0000000000000002
  [
    {
      "switch_id": "0000000000000002",
      "command_result": [
        {
          "qos": [
            {
              "priority": 1,
              "dl_type": "IPv4",
              "ip_dscp": 10,
              "actions": [
                {
                  "meter": "1"
                }
              ],
              "qos_id": 1
            }
          ]
        }
      ]
    }
  ]

root@ryu-vm:~# curl -X GET http://localhost:8080/qos/rules/0000000000000003
  [
    {
      "switch_id": "0000000000000003",
      "command_result": [
        {
          "qos": [
            {
              "priority": 1,
              "dl_type": "IPv4",
              "ip_dscp": 10,
              "actions": [
                {
                  "meter": "1"
                }
              ],
              "qos_id": 1
            }
          ]
        }
      ]
    }
  ]
대역폭 측정
이 상태에서 iperf로 대역폭 측정을 해 봅니다. h1 서버에서는 UDP 프로토콜에 해당하는 포트 번호 5001, 5002, 5003에서 수신 대기합니다. h2, h3는 클라이언트로, h1에 각각 지정된 유형의 트래픽을 보냅니다.
우선, h1과 h2에 2개, h3에 1개씩 터미널을 시작합니다.
mininet> xterm h1
mininet> xterm h2
mininet> xterm h3
mininet> xterm h3
...
Node: h1(1) (root):
root@ryu-vm:~# iperf -s -u -p 5001 &
root@ryu-vm:~# iperf -s -u -p 5002 &
root@ryu-vm:~# iperf -s -u -p 5003 &
...
Best-effort 및 AF11 트래픽 초과량 발생
Node: h2 (root):
root@ryu-vm:~# iperf -c 10.0.0.1 -p 5001 -u -b 800K
------------------------------------------------------------
Client connecting to 10.0.0.1, UDP port 5001
Sending 1470 byte datagrams
UDP buffer size:  208 KByte (default)
------------------------------------------------------------
[  4] local 10.0.0.3 port 60324 connected with 10.0.0.1 port 5001
[ ID] Interval       Transfer     Bandwidth
[  4]  0.0-10.0 sec   979 KBytes   800 Kbits/sec
[  4] Sent 682 datagrams
[  4] Server Report:
[  4]  0.0-11.9 sec   650 KBytes   449 Kbits/sec  18.458 ms  229/  682 (34%)
Node: h3(1) (root):
root@ryu-vm:~# iperf -c 10.0.0.1 -p 5002 -u -b 600K --tos 0x28
------------------------------------------------------------
Client connecting to 10.0.0.1, UDP port 5002
Sending 1470 byte datagrams
UDP buffer size:  208 KByte (default)
------------------------------------------------------------
[  4] local 10.0.0.2 port 53661 connected with 10.0.0.1 port 5002
[ ID] Interval       Transfer     Bandwidth
[  4]  0.0-10.0 sec   735 KBytes   600 Kbits/sec
[  4] Sent 512 datagrams
[  4] Server Report:
[  4]  0.0-10.0 sec   735 KBytes   600 Kbits/sec   7.497 ms    6/  512 (1.2%)
[  4]  0.0-10.0 sec  6 datagrams received out-of-order
AF11 트래픽이 계약 대역폭인 400Kbps를 초과하는 경우에도 Best-effort 트래픽보다 대역폭이 보장되어 있는 것을 확인할 수 있습니다.
AF11 초과 트래픽과 Best-effort와 AF11 계약 대역 내 트래픽
Node: h2 (root):
root@ryu-vm:~# iperf -c 10.0.0.1 -p 5001 -u -b 600K --tos 0x28
------------------------------------------------------------
Client connecting to 10.0.0.1, UDP port 5001
Sending 1470 byte datagrams
UDP buffer size:  208 KByte (default)
------------------------------------------------------------
[  4] local 10.0.0.2 port 42758 connected with 10.0.0.1 port 5001
[ ID] Interval       Transfer     Bandwidth
[  4]  0.0-10.0 sec   735 KBytes   600 Kbits/sec
[  4] Sent 512 datagrams
[  4] Server Report:
[  4]  0.0-10.0 sec   666 KBytes   544 Kbits/sec  500.361 ms   48/  512 (9.4%)
[  4]  0.0-10.0 sec  192 datagrams received out-of-order
Node: h3(1) (root):
root@ryu-vm:~# iperf -c 10.0.0.1 -p 5002 -u -b 500K
------------------------------------------------------------
Client connecting to 10.0.0.1, UDP port 5002
Sending 1470 byte datagrams
UDP buffer size:  208 KByte (default)
------------------------------------------------------------
[  4] local 10.0.0.3 port 42759 connected with 10.0.0.1 port 5002
[ ID] Interval       Transfer     Bandwidth
[  4]  0.0-10.0 sec   613 KBytes   500 Kbits/sec
[  4] Sent 427 datagrams
[  4] WARNING: did not receive ack of last datagram after 10 tries.
[  4] Server Report:
[  4]  0.0-14.0 sec   359 KBytes   210 Kbits/sec  102.479 ms  177/  427 (41%)
Node: h3(2) (root):
root@ryu-vm:~# iperf -c 10.0.0.1 -p 5003 -u -b 400K --tos 0x28
------------------------------------------------------------
Client connecting to 10.0.0.1, UDP port 5003
Sending 1470 byte datagrams
UDP buffer size:  208 KByte (default)
------------------------------------------------------------
[  4] local 10.0.0.3 port 35475 connected with 10.0.0.1 port 5003
[ ID] Interval       Transfer     Bandwidth
[  4]  0.0-10.1 sec   491 KBytes   400 Kbits/sec
[  4] Sent 342 datagrams
[  4] Server Report:
[  4]  0.0-10.5 sec   491 KBytes   384 Kbits/sec  15.422 ms    0/  342 (0%)
400Kbps의 계약 내역에 해당하는 트래픽은 드롭되지 않는 것을 알 수 있습니다.
AF11 초과 트래픽과 AF11 초과 트래픽
Node: h2 (root):
root@ryu-vm:~# iperf -c 10.0.0.1 -p 5001 -u -b 600K --tos 0x28
------------------------------------------------------------
Client connecting to 10.0.0.1, UDP port 5001
Sending 1470 byte datagrams
UDP buffer size:  208 KByte (default)
------------------------------------------------------------
[  4] local 10.0.0.3 port 50761 connected with 10.0.0.1 port 5001
[ ID] Interval       Transfer     Bandwidth
[  4]  0.0-10.0 sec   735 KBytes   600 Kbits/sec
[  4] Sent 512 datagrams
[  4] Server Report:
[  4]  0.0-11.0 sec   673 KBytes   501 Kbits/sec  964.490 ms   43/  512 (8.4%)
[  4]  0.0-11.0 sec  95 datagrams received out-of-order
Node: h3(1) (root):
root@ryu-vm:~# iperf -c 10.0.0.1 -p 5002 -u -b 600K --tos 0x28
------------------------------------------------------------
Client connecting to 10.0.0.1, UDP port 5002
Sending 1470 byte datagrams
UDP buffer size:  208 KByte (default)
------------------------------------------------------------
[  4] local 10.0.0.2 port 53066 connected with 10.0.0.1 port 5002
[ ID] Interval       Transfer     Bandwidth
[  4]  0.0-10.0 sec   735 KBytes   600 Kbits/sec
[  4] Sent 512 datagrams
[  4] Server Report:
[  4]  0.0-10.6 sec   665 KBytes   515 Kbits/sec  897.126 ms   49/  512 (9.6%)
[  4]  0.0-10.6 sec  93 datagrams received out-of-order
초과 트래픽은 동일한 수준으로 드롭되어있는 것을 알 수 있습니다.
이 장에서는 구체적인 예를 들면서 QoS REST API의 사용 방법을 설명했습니다.
REST API 목록
이 장에서 소개했던 reqt_qos의 REST API 목록입니다.
큐 상태 얻기
| 메서드 | GET |
| URL | /qos/queue/status/{switch} –switch: [ “all” | 스위치ID ] |
큐 설정 정보 얻기
| 메서드 | GET |
| URL | /qos/queue/{switch} –switch: [ “all” | 스위치ID ] |
| 참고 | QoS REST API를 시작한 이후 활성화된 큐의 설정 정보만 얻을 수 있습니다. |
큐 설정
| 메서드 | POST |
| URL | /qos/queue/{switch} –switch: [ “all” | 스위치ID ] |
| 데이터 | port_name:[구성된 포트 이름] type:[linux-htb | linux-hfsc] max_rate:[대역폭(bps)] queues:
|
| 참고 | 기존 설정이 있는 경우 덮어씁니다. OpenvSwitch에서만 설정이 가능합니다. port_name 매개 변수는 옵션이니다. port_name을 지정하지 않으면 모든 포트에 설정됩니다. |
큐 삭제
| 메서드 | DELETE |
| URL | /qos/queue/{swtich} –switch: [ “all” | 스위치ID ] |
| 참고 | OVSDB의 QoS 레코드와의 관계를 제거합니다. |
전체 QoS 규칙 얻기
| 메서드 | GET |
| URL | /qos/rules/{switch}[/{vlan}] –switch: [ “all” | 스위치ID ] –vlan: [ “all” | VLAN ID ] |
| 참고 | VLAN ID 지정은 옵션입니다. |
QoS 규칙 추가
| 메서드 | POST |
| URL | /qos/rules/{switch}[/{vlan}] –switch: [ “all” | 스위치ID ] –vlan: [ “all” | VLAN ID ] |
| 데이터 | priority:[ 0 - 65535 ] match:
actions:
|
| 참고 | 등록에 성공하면 QoS ID가 생성되어 응답에 포함됩니다. VLAN ID 지정은 옵션입니다. |
QoS 규칙 삭제
| 메서드 | DELETE |
| URL | /qos/rules/{switch}[/{vlan}] –switch: [ “all” | 스위치ID ] –vlan: [ “all” | VLAN ID ] |
| 데이터 | rule_id:[ “all” | 1 - ... ] |
| 참고 | VLAN ID 지정은 옵션입니다. |
미터 테이블 정보 얻기
| 메서드 | GET |
| URL | /qos/meter/{switch} –switch: [ “all” | 스위치ID ] |
미터 테이블 설정
| 메서드 | POST |
| URL | /qos/meter/{switch} |
| 데이터 | meter_id:미터 ID bands:
|
| 참고 | bands에 지정 및 적용하는 매개 변수는 action과 flags에 따라 달라집니다. |