ルータ
本章では、RESTで設定が出来るルータの使用方法について説明します。
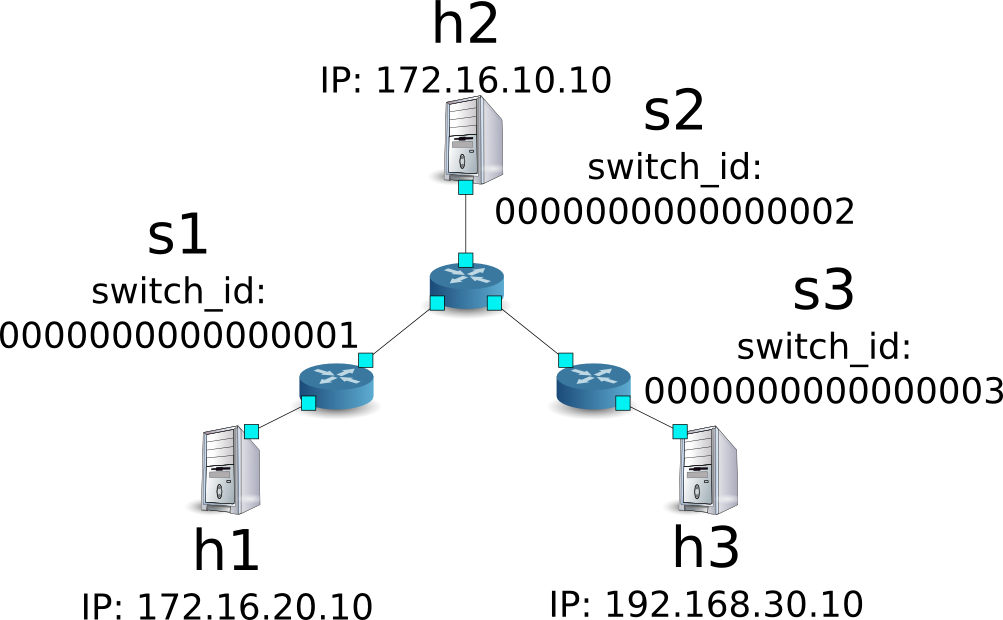
シングルテナントでの動作例
以下のようなトポロジを作成し、各スイッチ(ルータ)に対してアドレスやルートの追加・削除を行い、各ホスト間の疎通可否を確認する例を紹介します。
環境構築
まずはMininet上に環境を構築します。mnコマンドのパラメータは以下のようになります。
| パラメータ | 値 | 説明 |
|---|---|---|
| topo | linear,3 | 3台のスイッチが直列に接続されているトポロジ |
| mac | なし | 自動的にホストのMACアドレスをセットする |
| switch | ovsk | Open vSwitchを使用する |
| controller | remote | OpenFlowコントローラは外部のものを利用する |
| x | なし | xtermを起動する |
実行例は以下のようになります。
$ sudo mn --topo linear,3 --mac --switch ovsk --controller remote -x
*** Creating network
*** Adding controller
Unable to contact the remote controller at 127.0.0.1:6633
*** Adding hosts:
h1 h2 h3
*** Adding switches:
s1 s2 s3
*** Adding links:
(h1, s1) (h2, s2) (h3, s3) (s1, s2) (s2, s3)
*** Configuring hosts
h1 h2 h3
*** Running terms on localhost:10.0
*** Starting controller
*** Starting 3 switches
s1 s2 s3

*** Starting CLI:
mininet>
また、コントローラ用のxtermをもうひとつ起動しておきます。
mininet> xterm c0
mininet>
続いて、各ルータで使用するOpenFlowのバージョンを1.3に設定します。
switch: s1 (root):
# ovs-vsctl set Bridge s1 protocols=OpenFlow13
switch: s2 (root):
# ovs-vsctl set Bridge s2 protocols=OpenFlow13
switch: s3 (root):
# ovs-vsctl set Bridge s3 protocols=OpenFlow13
その後、各ホストで自動的に割り当てられているIPアドレスを削除し、新たにIPアドレスを設定します。
host: h1:
# ip addr del 10.0.0.1/8 dev h1-eth0
# ip addr add 172.16.20.10/24 dev h1-eth0
host: h2:
# ip addr del 10.0.0.2/8 dev h2-eth0
# ip addr add 172.16.10.10/24 dev h2-eth0
host: h3:
# ip addr del 10.0.0.3/8 dev h3-eth0
# ip addr add 192.168.30.10/24 dev h3-eth0
最後に、コントローラのxterm上でrest_routerを起動させます。
controller: c0 (root):
# ryu-manager ryu.app.rest_router
loading app ryu.app.rest_router
loading app ryu.controller.ofp_handler
instantiating app None of DPSet
creating context dpset
creating context wsgi
instantiating app ryu.app.rest_router of RestRouterAPI
instantiating app ryu.controller.ofp_handler of OFPHandler
(2212) wsgi starting up on http://0.0.0.0:8080/
Ryuとルータの間の接続に成功すると、次のメッセージが表示されます。
controller: c0 (root):
[RT][INFO] switch_id=0000000000000003: Set SW config for TTL error packet in.
[RT][INFO] switch_id=0000000000000003: Set ARP handling (packet in) flow [cookie=0x0]
[RT][INFO] switch_id=0000000000000003: Set L2 switching (normal) flow [cookie=0x0]
[RT][INFO] switch_id=0000000000000003: Set default route (drop) flow [cookie=0x0]
[RT][INFO] switch_id=0000000000000003: Start cyclic routing table update.
[RT][INFO] switch_id=0000000000000003: Join as router.
...
上記ログがルータ3台分表示されれば準備完了です。
アドレスの設定
各ルータにアドレスを設定します。
まず、ルータs1にアドレス「172.16.20.1/24」と「172.16.30.30/24」を設定します。
注釈
以降の説明で使用するREST APIの詳細は、章末の「REST API一覧」を参照してください。
Node: c0 (root):
# curl -X POST -d '{"address":"172.16.20.1/24"}' http://localhost:8080/router/0000000000000001
  [
    {
      "switch_id": "0000000000000001",
      "command_result": [
        {
          "result": "success",
          "details": "Add address [address_id=1]"
        }
      ]
    }
  ]

# curl -X POST -d '{"address": "172.16.30.30/24"}' http://localhost:8080/router/0000000000000001
  [
    {
      "switch_id": "0000000000000001",
      "command_result": [
        {
          "result": "success",
          "details": "Add address [address_id=2]"
        }
      ]
    }
  ]
注釈
RESTコマンドの実行結果は見やすいように整形しています。
続いて、ルータs2にアドレス「172.16.10.1/24」「172.16.30.1/24」「192.168.10.1/24」を設定します。
Node: c0 (root):
# curl -X POST -d '{"address":"172.16.10.1/24"}' http://localhost:8080/router/0000000000000002
  [
    {
      "switch_id": "0000000000000002",
      "command_result": [
        {
          "result": "success",
          "details": "Add address [address_id=1]"
        }
      ]
    }
  ]

# curl -X POST -d '{"address": "172.16.30.1/24"}' http://localhost:8080/router/0000000000000002
  [
    {
      "switch_id": "0000000000000002",
      "command_result": [
        {
          "result": "success",
          "details": "Add address [address_id=2]"
        }
      ]
    }
  ]

# curl -X POST -d '{"address": "192.168.10.1/24"}' http://localhost:8080/router/0000000000000002
  [
    {
      "switch_id": "0000000000000002",
      "command_result": [
        {
          "result": "success",
          "details": "Add address [address_id=3]"
        }
      ]
    }
  ]
さらに、ルータs3にアドレス「192.168.30.1/24」と「192.168.10.20/24」を設定します。
Node: c0 (root):
# curl -X POST -d '{"address": "192.168.30.1/24"}' http://localhost:8080/router/0000000000000003
  [
    {
      "switch_id": "0000000000000003",
      "command_result": [
        {
          "result": "success",
          "details": "Add address [address_id=1]"
        }
      ]
    }
  ]

# curl -X POST -d '{"address": "192.168.10.20/24"}' http://localhost:8080/router/0000000000000003
  [
    {
      "switch_id": "0000000000000003",
      "command_result": [
        {
          "result": "success",
          "details": "Add address [address_id=2]"
        }
      ]
    }
  ]
ルータへのIPアドレスの設定ができたので、各ホストにデフォルトゲートウェイとして登録します。
host: h1:
# ip route add default via 172.16.20.1
host: h2:
# ip route add default via 172.16.10.1
host: h3:
# ip route add default via 192.168.30.1
デフォルトルートの設定
各ルータにデフォルトルートを設定します。
まず、ルータs1のデフォルトルートとしてルータs2を設定します。
Node: c0 (root):
# curl -X POST -d '{"gateway": "172.16.30.1"}' http://localhost:8080/router/0000000000000001
  [
    {
      "switch_id": "0000000000000001",
      "command_result": [
        {
          "result": "success",
          "details": "Add route [route_id=1]"
        }
      ]
    }
  ]
ルータs2のデフォルトルートにはルータs1を設定します。
Node: c0 (root):
# curl -X POST -d '{"gateway": "172.16.30.30"}' http://localhost:8080/router/0000000000000002
  [
    {
      "switch_id": "0000000000000002",
      "command_result": [
        {
          "result": "success",
          "details": "Add route [route_id=1]"
        }
      ]
    }
  ]
ルータs3のデフォルトルートにはルータs2を設定します。
Node: c0 (root):
# curl -X POST -d '{"gateway": "192.168.10.1"}' http://localhost:8080/router/0000000000000003
  [
    {
      "switch_id": "0000000000000003",
      "command_result": [
        {
          "result": "success",
          "details": "Add route [route_id=1]"
        }
      ]
    }
  ]
静的ルートの設定
ルータs2に対し、ルータs3配下のホスト(192.168.30.0/24)へのスタティックルートを設定します。
Node: c0 (root):
# curl -X POST -d '{"destination": "192.168.30.0/24", "gateway": "192.168.10.20"}' http://localhost:8080/router/0000000000000002
  [
    {
      "switch_id": "0000000000000002",
      "command_result": [
        {
          "result": "success",
          "details": "Add route [route_id=2]"
        }
      ]
    }
  ]
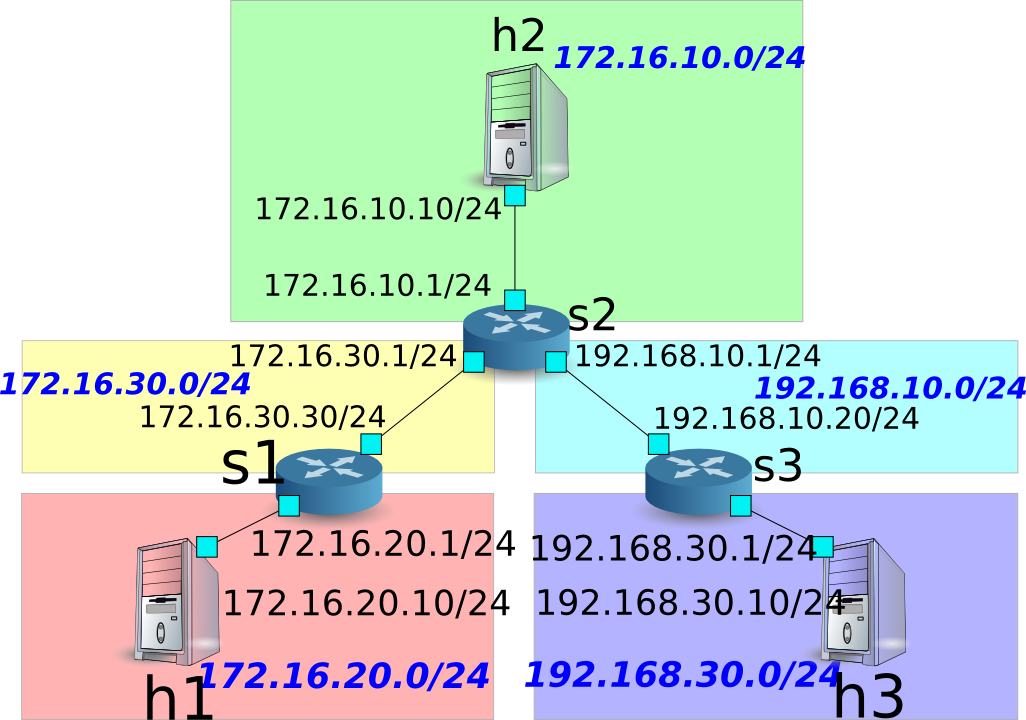
アドレスやルートの設定状態は、次のようになります。
設定内容の確認
各ルータに設定された内容を確認します。
Node: c0 (root):
# curl http://localhost:8080/router/0000000000000001
  [
    {
      "internal_network": [
        {
          "route": [
            {
              "route_id": 1,
              "destination": "0.0.0.0/0",
              "gateway": "172.16.30.1"
            }
          ],
          "address": [
            {
              "address_id": 1,
              "address": "172.16.20.1/24"
            },
            {
              "address_id": 2,
              "address": "172.16.30.30/24"
            }
          ]
        }
      ],
      "switch_id": "0000000000000001"
    }
  ]

# curl http://localhost:8080/router/0000000000000002
  [
    {
      "internal_network": [
        {
          "route": [
            {
              "route_id": 1,
              "destination": "0.0.0.0/0",
              "gateway": "172.16.30.30"
            },
            {
              "route_id": 2,
              "destination": "192.168.30.0/24",
              "gateway": "192.168.10.20"
            }
          ],
          "address": [
            {
              "address_id": 2,
              "address": "172.16.30.1/24"
            },
            {
              "address_id": 3,
              "address": "192.168.10.1/24"
            },
            {
              "address_id": 1,
              "address": "172.16.10.1/24"
            }
          ]
        }
      ],
      "switch_id": "0000000000000002"
    }
  ]

# curl http://localhost:8080/router/0000000000000003
  [
    {
      "internal_network": [
        {
          "route": [
            {
              "route_id": 1,
              "destination": "0.0.0.0/0",
              "gateway": "192.168.10.1"
            }
          ],
          "address": [
            {
              "address_id": 1,
              "address": "192.168.30.1/24"
            },
            {
              "address_id": 2,
              "address": "192.168.10.20/24"
            }
          ]
        }
      ],
      "switch_id": "0000000000000003"
    }
  ]
この状態で、pingによる疎通を確認してみます。まず、h2からh3へpingを実行します。正常に疎通できることが確認できます。
host: h2:
# ping 192.168.30.10
PING 192.168.30.10 (192.168.30.10) 56(84) bytes of data.
64 bytes from 192.168.30.10: icmp_req=1 ttl=62 time=48.8 ms
64 bytes from 192.168.30.10: icmp_req=2 ttl=62 time=0.402 ms
64 bytes from 192.168.30.10: icmp_req=3 ttl=62 time=0.089 ms
64 bytes from 192.168.30.10: icmp_req=4 ttl=62 time=0.065 ms
...
また、h2からh1へpingを実行します。こちらも正常に疎通できることが確認できます。
host: h2:
# ping 172.16.20.10
PING 172.16.20.10 (172.16.20.10) 56(84) bytes of data.
64 bytes from 172.16.20.10: icmp_req=1 ttl=62 time=43.2 ms
64 bytes from 172.16.20.10: icmp_req=2 ttl=62 time=0.306 ms
64 bytes from 172.16.20.10: icmp_req=3 ttl=62 time=0.057 ms
64 bytes from 172.16.20.10: icmp_req=4 ttl=62 time=0.048 ms
...
静的ルートの削除
ルータs2に設定したルータs3へのスタティックルートを削除します。
Node: c0 (root):
# curl -X DELETE -d '{"route_id": "2"}' http://localhost:8080/router/0000000000000002
  [
    {
      "switch_id": "0000000000000002",
      "command_result": [
        {
          "result": "success",
          "details": "Delete route [route_id=2]"
        }
      ]
    }
  ]
ルータs2に設定された情報を確認してみます。ルータs3へのスタティックルートが削除されていることがわかります。
Node: c0 (root):
# curl http://localhost:8080/router/0000000000000002
  [
    {
      "internal_network": [
        {
          "route": [
            {
              "route_id": 1,
              "destination": "0.0.0.0/0",
              "gateway": "172.16.30.30"
            }
          ],
          "address": [
            {
              "address_id": 2,
              "address": "172.16.30.1/24"
            },
            {
              "address_id": 3,
              "address": "192.168.10.1/24"
            },
            {
              "address_id": 1,
              "address": "172.16.10.1/24"
            }
          ]
        }
      ],
      "switch_id": "0000000000000002"
    }
  ]
この状態で、pingによる疎通を確認してみます。h2からh3へはルート情報がなくなったため、疎通できないことがわかります。
host: h2:
# ping 192.168.30.10
PING 192.168.30.10 (192.168.30.10) 56(84) bytes of data.
^C
--- 192.168.30.10 ping statistics ---
12 packets transmitted, 0 received, 100% packet loss, time 11088ms
アドレスの削除
ルータs1に設定したアドレス「172.16.20.1/24」を削除します。
Node: c0 (root):
# curl -X DELETE -d '{"address_id": "1"}' http://localhost:8080/router/0000000000000001
  [
    {
      "switch_id": "0000000000000001",
      "command_result": [
        {
          "result": "success",
          "details": "Delete address [address_id=1]"
        }
      ]
    }
  ]
ルータs1に設定された情報を確認してみます。ルータs1に設定されたIPアドレスのうち、「172.16.20.1/24」が削除されていることがわかります。
Node: c0 (root):
# curl http://localhost:8080/router/0000000000000001
  [
    {
      "internal_network": [
        {
          "route": [
            {
              "route_id": 1,
              "destination": "0.0.0.0/0",
              "gateway": "172.16.30.1"
            }
          ],
          "address": [
            {
              "address_id": 2,
              "address": "172.16.30.30/24"
            }
          ]
        }
      ],
      "switch_id": "0000000000000001"
    }
  ]
この状態で、pingによる疎通を確認してみます。h2からh1へは、h1の所属するサブネットに関する情報がルータs1から削除されたため、疎通できないことがわかります。
host: h2:
# ping 172.16.20.10
PING 172.16.20.10 (172.16.20.10) 56(84) bytes of data.
^C
--- 172.16.20.10 ping statistics ---
19 packets transmitted, 0 received, 100% packet loss, time 18004ms
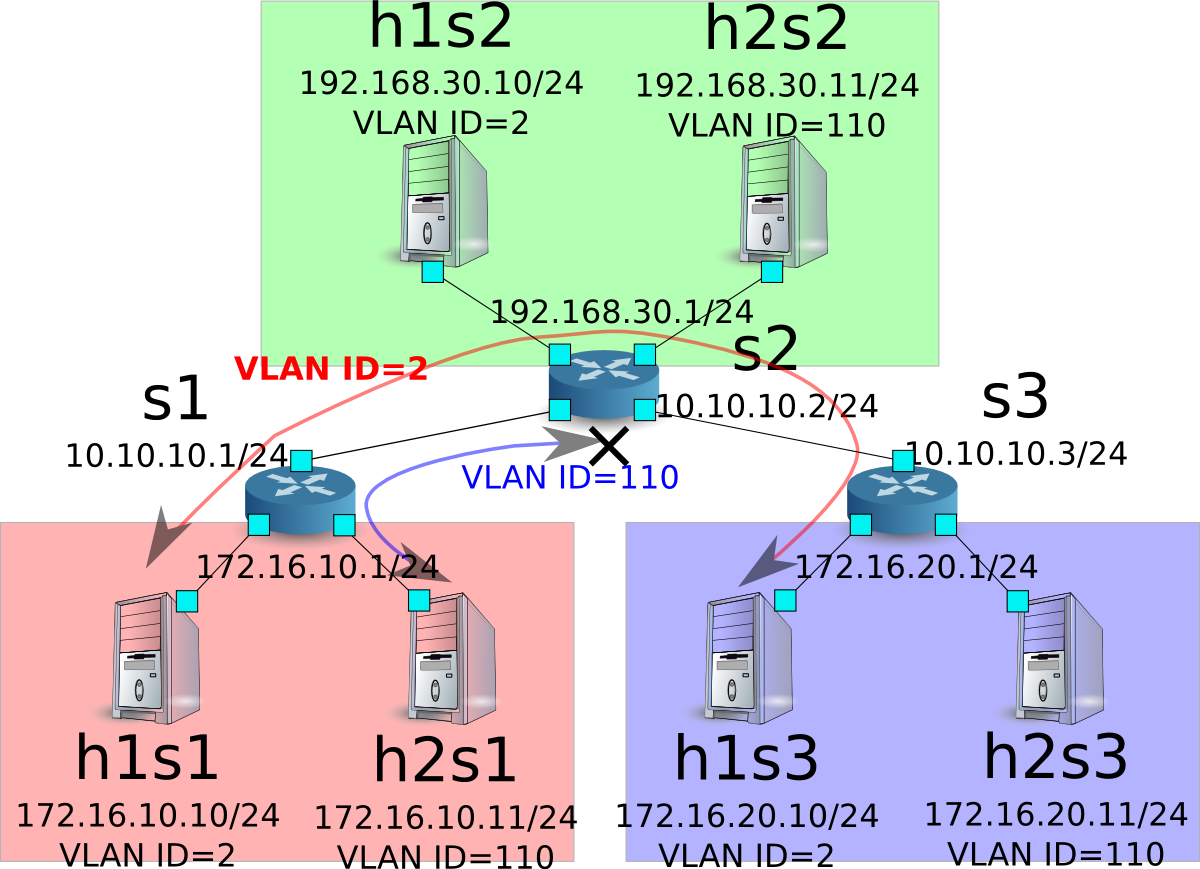
マルチテナントでの動作例
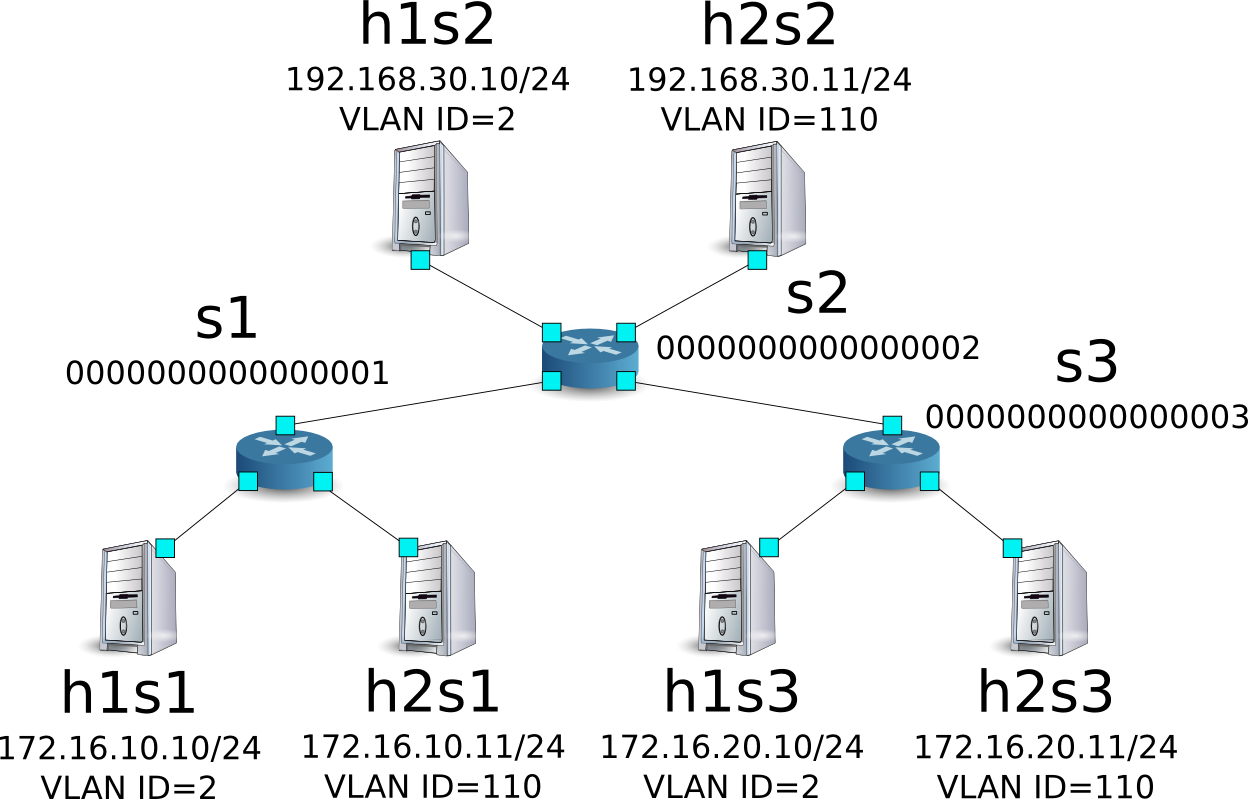
続いて、VLANによるテナント分けが行われている以下のようなトポロジを作成し、各スイッチ(ルータ)に対してアドレスやルートの追加・削除を行い、各ホスト間の疎通可否を確認する例を紹介します。
環境構築
まずはMininet上に環境を構築します。mnコマンドのパラメータは以下のようになります。
| パラメータ | 値 | 説明 |
|---|---|---|
| topo | linear,3,2 | 3台のスイッチが直列に接続されているトポロジ (各スイッチに2台のホストが接続される) |
| mac | なし | 自動的にホストのMACアドレスをセットする |
| switch | ovsk | Open vSwitchを使用する |
| controller | remote | OpenFlowコントローラは外部のものを利用する |
| x | なし | xtermを起動する |
実行例は以下のようになります。
$ sudo mn --topo linear,3,2 --mac --switch ovsk --controller remote -x
*** Creating network
*** Adding controller
Unable to contact the remote controller at 127.0.0.1:6633
*** Adding hosts:
h1s1 h1s2 h1s3 h2s1 h2s2 h2s3
*** Adding switches:
s1 s2 s3
*** Adding links:
(h1s1, s1) (h1s2, s2) (h1s3, s3) (h2s1, s1) (h2s2, s2) (h2s3, s3) (s1, s2) (s2, s3)
*** Configuring hosts
h1s1 h1s2 h1s3 h2s1 h2s2 h2s3
*** Running terms on localhost:10.0
*** Starting controller
*** Starting 3 switches
s1 s2 s3
*** Starting CLI:
mininet>
また、コントローラ用のxtermをもうひとつ起動しておきます。
mininet> xterm c0
mininet>
続いて、各ルータで使用するOpenFlowのバージョンを1.3に設定します。
switch: s1 (root):
# ovs-vsctl set Bridge s1 protocols=OpenFlow13
switch: s2 (root):
# ovs-vsctl set Bridge s2 protocols=OpenFlow13
switch: s3 (root):
# ovs-vsctl set Bridge s3 protocols=OpenFlow13
その後、各ホストのインターフェースに VLAN ID を設定し、新たにIPアドレスを設定します。
host: h1s1:
# ip addr del 10.0.0.1/8 dev h1s1-eth0
# ip link add link h1s1-eth0 name h1s1-eth0.2 type vlan id 2
# ip addr add 172.16.10.10/24 dev h1s1-eth0.2
# ip link set dev h1s1-eth0.2 up
host: h2s1:
# ip addr del 10.0.0.4/8 dev h2s1-eth0
# ip link add link h2s1-eth0 name h2s1-eth0.110 type vlan id 110
# ip addr add 172.16.10.11/24 dev h2s1-eth0.110
# ip link set dev h2s1-eth0.110 up
host: h1s2:
# ip addr del 10.0.0.2/8 dev h1s2-eth0
# ip link add link h1s2-eth0 name h1s2-eth0.2 type vlan id 2
# ip addr add 192.168.30.10/24 dev h1s2-eth0.2
# ip link set dev h1s2-eth0.2 up
host: h2s2:
# ip addr del 10.0.0.5/8 dev h2s2-eth0
# ip link add link h2s2-eth0 name h2s2-eth0.110 type vlan id 110
# ip addr add 192.168.30.11/24 dev h2s2-eth0.110
# ip link set dev h2s2-eth0.110 up
host: h1s3:
# ip addr del 10.0.0.3/8 dev h1s3-eth0
# ip link add link h1s3-eth0 name h1s3-eth0.2 type vlan id 2
# ip addr add 172.16.20.10/24 dev h1s3-eth0.2
# ip link set dev h1s3-eth0.2 up
host: h2s3:
# ip addr del 10.0.0.6/8 dev h2s3-eth0
# ip link add link h2s3-eth0 name h2s3-eth0.110 type vlan id 110
# ip addr add 172.16.20.11/24 dev h2s3-eth0.110
# ip link set dev h2s3-eth0.110 up
最後に、コントローラのxterm上でrest_routerを起動させます。
controller: c0 (root):
# ryu-manager ryu.app.rest_router
loading app ryu.app.rest_router
loading app ryu.controller.ofp_handler
instantiating app None of DPSet
creating context dpset
creating context wsgi
instantiating app ryu.app.rest_router of RestRouterAPI
instantiating app ryu.controller.ofp_handler of OFPHandler
(2447) wsgi starting up on http://0.0.0.0:8080/
Ryuとルータの間の接続に成功すると、次のメッセージが表示されます。
controller: c0 (root):
[RT][INFO] switch_id=0000000000000003: Set SW config for TTL error packet in.
[RT][INFO] switch_id=0000000000000003: Set ARP handling (packet in) flow [cookie=0x0]
[RT][INFO] switch_id=0000000000000003: Set L2 switching (normal) flow [cookie=0x0]
[RT][INFO] switch_id=0000000000000003: Set default route (drop) flow [cookie=0x0]
[RT][INFO] switch_id=0000000000000003: Start cyclic routing table update.
[RT][INFO] switch_id=0000000000000003: Join as router.
...
上記ログがルータ3台分表示されれば準備完了です。
アドレスの設定
各ルータにアドレスを設定します。
まず、ルータs1にアドレス「172.16.10.1/24」と「10.10.10.1/24」を設定します。それぞれVLAN IDごとに設定する必要があります。
Node: c0 (root):
# curl -X POST -d '{"address": "172.16.10.1/24"}' http://localhost:8080/router/0000000000000001/2
  [
    {
      "switch_id": "0000000000000001",
      "command_result": [
        {
          "result": "success",
          "vlan_id": 2,
          "details": "Add address [address_id=1]"
        }
      ]
    }
  ]

# curl -X POST -d '{"address": "10.10.10.1/24"}' http://localhost:8080/router/0000000000000001/2
  [
    {
      "switch_id": "0000000000000001",
      "command_result": [
        {
          "result": "success",
          "vlan_id": 2,
          "details": "Add address [address_id=2]"
        }
      ]
    }
  ]

# curl -X POST -d '{"address": "172.16.10.1/24"}' http://localhost:8080/router/0000000000000001/110
  [
    {
      "switch_id": "0000000000000001",
      "command_result": [
        {
          "result": "success",
          "vlan_id": 110,
          "details": "Add address [address_id=1]"
        }
      ]
    }
  ]

# curl -X POST -d '{"address": "10.10.10.1/24"}' http://localhost:8080/router/0000000000000001/110
  [
    {
      "switch_id": "0000000000000001",
      "command_result": [
        {
          "result": "success",
          "vlan_id": 110,
          "details": "Add address [address_id=2]"
        }
      ]
    }
  ]
続いて、ルータs2にアドレス「192.168.30.1/24」と「10.10.10.2/24」を設定します。
Node: c0 (root):
# curl -X POST -d '{"address": "192.168.30.1/24"}' http://localhost:8080/router/0000000000000002/2
  [
    {
      "switch_id": "0000000000000002",
      "command_result": [
        {
          "result": "success",
          "vlan_id": 2,
          "details": "Add address [address_id=1]"
        }
      ]
    }
  ]

# curl -X POST -d '{"address": "10.10.10.2/24"}' http://localhost:8080/router/0000000000000002/2
  [
    {
      "switch_id": "0000000000000002",
      "command_result": [
        {
          "result": "success",
          "vlan_id": 2,
          "details": "Add address [address_id=2]"
        }
      ]
    }
  ]

# curl -X POST -d '{"address": "192.168.30.1/24"}' http://localhost:8080/router/0000000000000002/110
  [
    {
      "switch_id": "0000000000000002",
      "command_result": [
        {
          "result": "success",
          "vlan_id": 110,
          "details": "Add address [address_id=1]"
        }
      ]
    }
  ]

# curl -X POST -d '{"address": "10.10.10.2/24"}' http://localhost:8080/router/0000000000000002/110
  [
    {
      "switch_id": "0000000000000002",
      "command_result": [
        {
          "result": "success",
          "vlan_id": 110,
          "details": "Add address [address_id=2]"
        }
      ]
    }
  ]
さらに、ルータs3にアドレス「172.16.20.1/24」と「10.10.10.3/24」を設定します。
Node: c0 (root):
# curl -X POST -d '{"address": "172.16.20.1/24"}' http://localhost:8080/router/0000000000000003/2
  [
    {
      "switch_id": "0000000000000003",
      "command_result": [
        {
          "result": "success",
          "vlan_id": 2,
          "details": "Add address [address_id=1]"
        }
      ]
    }
  ]

# curl -X POST -d '{"address": "10.10.10.3/24"}' http://localhost:8080/router/0000000000000003/2
  [
    {
      "switch_id": "0000000000000003",
      "command_result": [
        {
          "result": "success",
          "vlan_id": 2,
          "details": "Add address [address_id=2]"
        }
      ]
    }
  ]

# curl -X POST -d '{"address": "172.16.20.1/24"}' http://localhost:8080/router/0000000000000003/110
  [
    {
      "switch_id": "0000000000000003",
      "command_result": [
        {
          "result": "success",
          "vlan_id": 110,
          "details": "Add address [address_id=1]"
        }
      ]
    }
  ]

# curl -X POST -d '{"address": "10.10.10.3/24"}' http://localhost:8080/router/0000000000000003/110
  [
    {
      "switch_id": "0000000000000003",
      "command_result": [
        {
          "result": "success",
          "vlan_id": 110,
          "details": "Add address [address_id=2]"
        }
      ]
    }
  ]
ルータへのIPアドレスの設定ができたので、各ホストにデフォルトゲートウェイとして登録します。
host: h1s1:
# ip route add default via 172.16.10.1
host: h2s1:
# ip route add default via 172.16.10.1
host: h1s2:
# ip route add default via 192.168.30.1
host: h2s2:
# ip route add default via 192.168.30.1
host: h1s3:
# ip route add default via 172.16.20.1
host: h2s3:
# ip route add default via 172.16.20.1
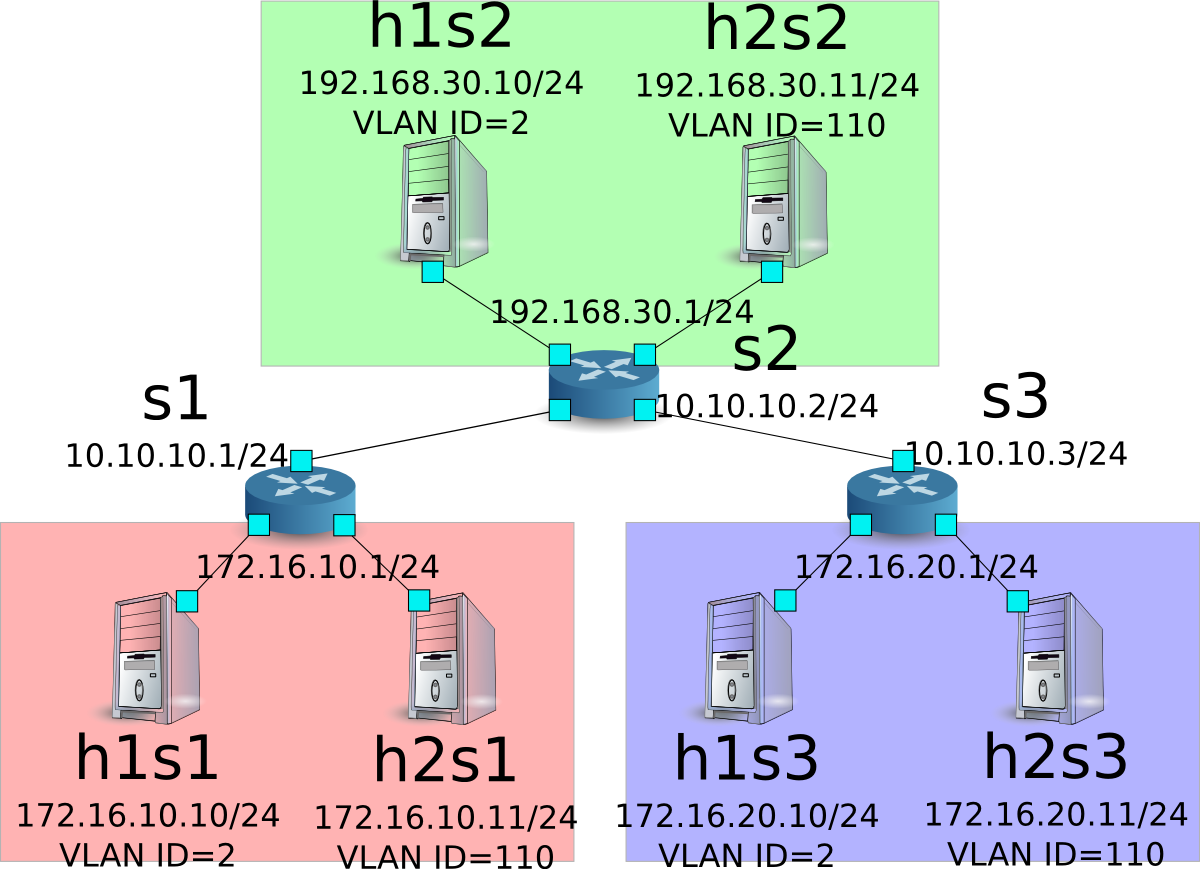
設定されたアドレスは、次の通りです。
デフォルトルートと静的ルートの設定
各ルータにデフォルトルートと静的ルートを設定します。
まず、ルータs1のデフォルトルートとしてルータs2を設定します。
Node: c0 (root):
# curl -X POST -d '{"gateway": "10.10.10.2"}' http://localhost:8080/router/0000000000000001/2
  [
    {
      "switch_id": "0000000000000001",
      "command_result": [
        {
          "result": "success",
          "vlan_id": 2,
          "details": "Add route [route_id=1]"
        }
      ]
    }
  ]

# curl -X POST -d '{"gateway": "10.10.10.2"}' http://localhost:8080/router/0000000000000001/110
  [
    {
      "switch_id": "0000000000000001",
      "command_result": [
        {
          "result": "success",
          "vlan_id": 110,
          "details": "Add route [route_id=1]"
        }
      ]
    }
  ]
ルータs2のデフォルトルートにはルータs1を設定します。
Node: c0 (root):
# curl -X POST -d '{"gateway": "10.10.10.1"}' http://localhost:8080/router/0000000000000002/2
  [
    {
      "switch_id": "0000000000000002",
      "command_result": [
        {
          "result": "success",
          "vlan_id": 2,
          "details": "Add route [route_id=1]"
        }
      ]
    }
  ]

# curl -X POST -d '{"gateway": "10.10.10.1"}' http://localhost:8080/router/0000000000000002/110
  [
    {
      "switch_id": "0000000000000002",
      "command_result": [
        {
          "result": "success",
          "vlan_id": 110,
          "details": "Add route [route_id=1]"
        }
      ]
    }
  ]
ルータs3のデフォルトルートにはルータs2を設定します。
Node: c0 (root):
# curl -X POST -d '{"gateway": "10.10.10.2"}' http://localhost:8080/router/0000000000000003/2
  [
    {
      "switch_id": "0000000000000003",
      "command_result": [
        {
          "result": "success",
          "vlan_id": 2,
          "details": "Add route [route_id=1]"
        }
      ]
    }
  ]

# curl -X POST -d '{"gateway": "10.10.10.2"}' http://localhost:8080/router/0000000000000003/110
  [
    {
      "switch_id": "0000000000000003",
      "command_result": [
        {
          "result": "success",
          "vlan_id": 110,
          "details": "Add route [route_id=1]"
        }
      ]
    }
  ]
続いてルータs2に対し、ルータs3配下のホスト(172.16.20.0/24)へのスタティックルートを設定します。vlan_id=2の場合のみ設定します。
Node: c0 (root):
# curl -X POST -d '{"destination": "172.16.20.0/24", "gateway": "10.10.10.3"}' http://localhost:8080/router/0000000000000002/2
  [
    {
      "switch_id": "0000000000000002",
      "command_result": [
        {
          "result": "success",
          "vlan_id": 2,
          "details": "Add route [route_id=2]"
        }
      ]
    }
  ]
設定内容の確認
各ルータに設定された内容を確認します。
Node: c0 (root):
# curl http://localhost:8080/router/all/all
  [
    {
      "internal_network": [
        {},
        {
          "route": [
            {
              "route_id": 1,
              "destination": "0.0.0.0/0",
              "gateway": "10.10.10.2"
            }
          ],
          "vlan_id": 2,
          "address": [
            {
              "address_id": 2,
              "address": "10.10.10.1/24"
            },
            {
              "address_id": 1,
              "address": "172.16.10.1/24"
            }
          ]
        },
        {
          "route": [
            {
              "route_id": 1,
              "destination": "0.0.0.0/0",
              "gateway": "10.10.10.2"
            }
          ],
          "vlan_id": 110,
          "address": [
            {
              "address_id": 2,
              "address": "10.10.10.1/24"
            },
            {
              "address_id": 1,
              "address": "172.16.10.1/24"
            }
          ]
        }
      ],
      "switch_id": "0000000000000001"
    },
    {
      "internal_network": [
        {},
        {
          "route": [
            {
              "route_id": 2,
              "destination": "172.16.20.0/24",
              "gateway": "10.10.10.3"
            },
            {
              "route_id": 1,
              "destination": "0.0.0.0/0",
              "gateway": "10.10.10.1"
            }
          ],
          "vlan_id": 2,
          "address": [
            {
              "address_id": 2,
              "address": "10.10.10.2/24"
            },
            {
              "address_id": 1,
              "address": "192.168.30.1/24"
            }
          ]
        },
        {
          "route": [
            {
              "route_id": 1,
              "destination": "0.0.0.0/0",
              "gateway": "10.10.10.1"
            }
          ],
          "vlan_id": 110,
          "address": [
            {
              "address_id": 2,
              "address": "10.10.10.2/24"
            },
            {
              "address_id": 1,
              "address": "192.168.30.1/24"
            }
          ]
        }
      ],
      "switch_id": "0000000000000002"
    },
    {
      "internal_network": [
        {},
        {
          "route": [
            {
              "route_id": 1,
              "destination": "0.0.0.0/0",
              "gateway": "10.10.10.2"
            }
          ],
          "vlan_id": 2,
          "address": [
            {
              "address_id": 1,
              "address": "172.16.20.1/24"
            },
            {
              "address_id": 2,
              "address": "10.10.10.3/24"
            }
          ]
        },
        {
          "route": [
            {
              "route_id": 1,
              "destination": "0.0.0.0/0",
              "gateway": "10.10.10.2"
            }
          ],
          "vlan_id": 110,
          "address": [
            {
              "address_id": 1,
              "address": "172.16.20.1/24"
            },
            {
              "address_id": 2,
              "address": "10.10.10.3/24"
            }
          ]
        }
      ],
      "switch_id": "0000000000000003"
    }
  ]
各ルータの設定内容を表にすると、下記のようになります。
| ルータ | VLAN ID | IPアドレス | デフォルトルート | 静的ルート |
|---|---|---|---|---|
| s1 | 2 | 172.16.10.1/24, 10.10.10.1/24 | 10.10.10.2(s2) | |
| s1 | 110 | 172.16.10.1/24, 10.10.10.1/24 | 10.10.10.2(s2) | |
| s2 | 2 | 192.168.30.1/24, 10.10.10.2/24 | 10.10.10.1(s1) | 宛先:172.16.20.0/24, ゲートウェイ:10.10.10.3(s3) |
| s2 | 110 | 192.168.30.1/24, 10.10.10.2/24 | 10.10.10.1(s1) | |
| s3 | 2 | 172.16.20.1/24, 10.10.10.3/24 | 10.10.10.2(s2) | |
| s3 | 110 | 172.16.20.1/24, 10.10.10.3/24 | 10.10.10.2(s2) |
h1s1からh1s3に対しpingを送信してみます。同じvlan_id=2のホスト同士であり、ルータs2にs3宛の静的ルートが設定されているため、疎通が可能です。
host: h1s1:
# ping 172.16.20.10
PING 172.16.20.10 (172.16.20.10) 56(84) bytes of data.
64 bytes from 172.16.20.10: icmp_req=1 ttl=61 time=45.9 ms
64 bytes from 172.16.20.10: icmp_req=2 ttl=61 time=0.257 ms
64 bytes from 172.16.20.10: icmp_req=3 ttl=61 time=0.059 ms
64 bytes from 172.16.20.10: icmp_req=4 ttl=61 time=0.182 ms
h2s1からh2s3に対しpingを送信してみます。同じvlan_id=110のホスト同士ですが、ルータs2にs3宛の静的ルートが設定されていないため、疎通が不可能です。
host: h2s1:
# ping 172.16.20.11
PING 172.16.20.11 (172.16.20.11) 56(84) bytes of data.
^C
--- 172.16.20.11 ping statistics ---
8 packets transmitted, 0 received, 100% packet loss, time 7009ms
本章では、具体例を挙げながらルータの使用方法を説明しました。
REST API一覧
本章で紹介したrest_routerのREST API一覧です。
設定の取得
| メソッド | GET |
| URL | /router/{switch}[/{vlan}] –switch: [ “all” |スイッチID] –vlan: [ “all” |VLAN ID] |
| 備考 | VLAN IDの指定はオプションです。 |
アドレスの設定
| メソッド | POST |
| URL | /router/{switch}[/{vlan}] –switch: [ “all” |スイッチID] –vlan: [ “all” |VLAN ID] |
| データ | address:”<xxx.xxx.xxx.xxx/xx>” |
| 備考 | アドレス設定はルート設定前に行ってください。 VLAN IDの指定はオプションです。 |
静的ルートの設定
| メソッド | POST |
| URL | /router/{switch}[/{vlan}] –switch: [ “all” |スイッチID] –vlan: [ “all” |VLAN ID] |
| データ | destination:”<xxx.xxx.xxx.xxx/xx>” gateway:”<xxx.xxx.xxx.xxx>” |
| 備考 | VLAN IDの指定はオプションです。 |
デフォルトルートの設定
| メソッド | POST |
| URL | /router/{switch}[/{vlan}] –switch: [ “all” |スイッチID] –vlan: [ “all” |VLAN ID] |
| データ | gateway:”<xxx.xxx.xxx.xxx>” |
| 備考 | VLAN IDの指定はオプションです。 |
アドレスの削除
| メソッド | DELETE |
| URL | /router/{switch}[/{vlan}] –switch: [ “all” |スイッチID] –vlan: [ “all” |VLAN ID] |
| データ | address_id:[ 1 - ... ] |
| 備考 | VLAN IDの指定はオプションです。 |
ルートの削除
| メソッド | DELETE |
| URL | /router/{switch}[/{vlan}] –switch: [ “all” |スイッチID] –vlan: [ “all” |VLAN ID] |
| データ | route_id:[ 1 - ... ] |
| 備考 | VLAN IDの指定はオプションです。 |