防火牆( Firewall )
本章將說明如何利用 REST 的方式使用防火牆。
Single tenant 操作範例
以下說明如何建立一個如下所示的拓璞,並且對交換器 s1 進行路由的增加和刪除。
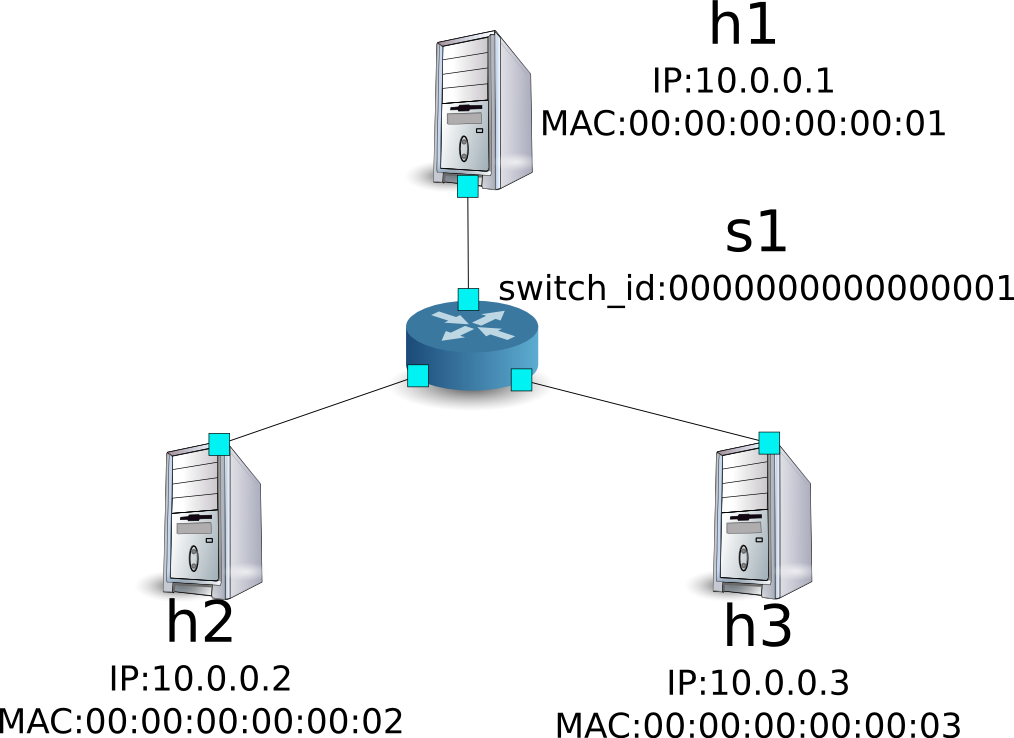
環境構築
首先在 Mininet 上建構環境。所要輸入的指令跟 「 交換器( Switching Hub ) 」 是一樣的。
ryu@ryu-vm:~$ sudo mn --topo single,3 --mac --switch ovsk --controller remote -x
*** Creating network
*** Adding controller
Unable to contact the remote controller at 127.0.0.1:6633
*** Adding hosts:
h1 h2 h3
*** Adding switches:
s1
*** Adding links:
(h1, s1) (h2, s1) (h3, s1)
*** Configuring hosts
h1 h2 h3
*** Running terms on localhost:10.0
*** Starting controller
*** Starting 1 switches
s1

*** Starting CLI:
mininet>
接著建立一個新的 xterm 用來操作 Controller。
mininet> xterm c0
mininet>
將 OpenFlow 的版本設定為 1.3。
switch: s1 (root):
root@ryu-vm:~# ovs-vsctl set Bridge s1 protocols=OpenFlow13
最後在控制 Controller 的 xterm 上啟動 rest_firewall。
controller: c0 (root):
root@ryu-vm:~# ryu-manager ryu.app.rest_firewall
loading app ryu.app.rest_firewall
loading app ryu.controller.ofp_handler
instantiating app None of DPSet
creating context dpset
creating context wsgi
instantiating app ryu.app.rest_firewall of RestFirewallAPI
instantiating app ryu.controller.ofp_handler of OFPHandler
(2210) wsgi starting up on http://0.0.0.0:8080/
Ryu 和交換器中間的連線已經完成後,會出現下面的訊息。
controller: c0 (root):
[FW][INFO] switch_id=0000000000000001: Join as firewall
改變初始狀態
防火牆啟動後,在初始狀態下全部的網路都會處於無法連線的狀態。 接下來我們要下指令使其生效,並開放網路的連線。
備註
接下來的說明會使用到 REST API,若需要詳細的解釋請參考本章結尾的「 REST API 列表 」。
Node: c0 (root):
root@ryu-vm:~# curl -X PUT http://localhost:8080/firewall/module/enable/0000000000000001
  [
    {
      "switch_id": "0000000000000001",
      "command_result": {
        "result": "success",
        "details": "firewall running."
      }
    }
  ]

root@ryu-vm:~# curl http://localhost:8080/firewall/module/status
  [
    {
      "status": "enable",
      "switch_id": "0000000000000001"
    }
  ]
備註
REST 命令執行的結果已經被格式為較為容易理解的格式。
確認可以從 h1 向 h2 執行 ping 指令。 但是存取的權限規則並沒有被設定,所以目前是處於無法連通的狀態。
host: h1:
root@ryu-vm:~# ping 10.0.0.2
PING 10.0.0.2 (10.0.0.2) 56(84) bytes of data.
^C
--- 10.0.0.2 ping statistics ---
20 packets transmitted, 0 received, 100% packet loss, time 19003ms
封包被阻擋的過程被寫進記錄擋( log )中。
controller: c0 (root):
[FW][INFO] dpid=0000000000000001: Blocked packet = ethernet(dst='00:00:00:00:00:02',ethertype=2048,src='00:00:00:00:00:01'), ipv4(csum=9895,dst='10.0.0.2',flags=2,header_length=5,identification=0,offset=0,option=None,proto=1,src='10.0.0.1',tos=0,total_length=84,ttl=64,version=4), icmp(code=0,csum=55644,data=echo(data='K\x8e\xaeR\x00\x00\x00\x00=\xc6\r\x00\x00\x00\x00\x00\x10\x11\x12\x13\x14\x15\x16\x17\x18\x19\x1a\x1b\x1c\x1d\x1e\x1f !"#$%&\'()*+,-./01234567',id=6952,seq=1),type=8)
...
新增規則
增加 h1 和 h2 之間允許 ping 發送的規則。不論是從哪個方向都需要加入。
接下來新增規則,規則的編號會自動編碼。
| 來源 | 目的 | 通訊協定 | 連線狀態 | 規則 ID |
|---|---|---|---|---|
| 10.0.0.1/32 | 10.0.0.2/32 | ICMP | 通過 | 1 |
| 10.0.0.2/32 | 10.0.0.1/32 | ICMP | 通過 | 2 |
Node: c0 (root):
root@ryu-vm:~# curl -X POST -d '{"nw_src": "10.0.0.1/32", "nw_dst": "10.0.0.2/32", "nw_proto": "ICMP"}' http://localhost:8080/firewall/rules/0000000000000001
  [
    {
      "switch_id": "0000000000000001",
      "command_result": [
        {
          "result": "success",
          "details": "Rule added. : rule_id=1"
        }
      ]
    }
  ]

root@ryu-vm:~# curl -X POST -d '{"nw_src": "10.0.0.2/32", "nw_dst": "10.0.0.1/32", "nw_proto": "ICMP"}' http://localhost:8080/firewall/rules/0000000000000001
  [
    {
      "switch_id": "0000000000000001",
      "command_result": [
        {
          "result": "success",
          "details": "Rule added. : rule_id=2"
        }
      ]
    }
  ]
新增加的規則做為 Flow Entry 被註冊到交換器中。
switch: s1 (root):
root@ryu-vm:~# ovs-ofctl -O openflow13 dump-flows s1
OFPST_FLOW reply (OF1.3) (xid=0x2):
 cookie=0x0, duration=823.705s, table=0, n_packets=10, n_bytes=420, priority=65534,arp actions=NORMAL
 cookie=0x0, duration=542.472s, table=0, n_packets=20, n_bytes=1960, priority=0 actions=CONTROLLER:128
 cookie=0x1, duration=145.05s, table=0, n_packets=0, n_bytes=0, priority=1,icmp,nw_src=10.0.0.1,nw_dst=10.0.0.2 actions=NORMAL
 cookie=0x2, duration=118.265s, table=0, n_packets=0, n_bytes=0, priority=1,icmp,nw_src=10.0.0.2,nw_dst=10.0.0.1 actions=NORMAL
接著 h2 和 h3 之間,新增加規則允許包含 ping 的所有 ipv4 封包通過。
| 來源 | 目的 | 通訊協定 | 連線狀態 | 規則ID |
|---|---|---|---|---|
| 10.0.0.2/32 | 10.0.0.3/32 | any | 通過 | 3 |
| 10.0.0.3/32 | 10.0.0.2/32 | any | 通過 | 4 |
Node: c0 (root):
root@ryu-vm:~# curl -X POST -d '{"nw_src": "10.0.0.2/32", "nw_dst": "10.0.0.3/32"}' http://localhost:8080/firewall/rules/0000000000000001
  [
    {
      "switch_id": "0000000000000001",
      "command_result": [
        {
          "result": "success",
          "details": "Rule added. : rule_id=3"
        }
      ]
    }
  ]

root@ryu-vm:~# curl -X POST -d '{"nw_src": "10.0.0.3/32", "nw_dst": "10.0.0.2/32"}' http://localhost:8080/firewall/rules/0000000000000001
  [
    {
      "switch_id": "0000000000000001",
      "command_result": [
        {
          "result": "success",
          "details": "Rule added. : rule_id=4"
        }
      ]
    }
  ]
新增的規則作為 Flow Entry 被註冊到交換器當中。
switch: s1 (root):
OFPST_FLOW reply (OF1.3) (xid=0x2):
 cookie=0x3, duration=12.724s, table=0, n_packets=0, n_bytes=0, priority=1,ip,nw_src=10.0.0.2,nw_dst=10.0.0.3 actions=NORMAL
 cookie=0x4, duration=3.668s, table=0, n_packets=0, n_bytes=0, priority=1,ip,nw_src=10.0.0.3,nw_dst=10.0.0.2 actions=NORMAL
 cookie=0x0, duration=1040.802s, table=0, n_packets=10, n_bytes=420, priority=65534,arp actions=NORMAL
 cookie=0x0, duration=759.569s, table=0, n_packets=20, n_bytes=1960, priority=0 actions=CONTROLLER:128
 cookie=0x1, duration=362.147s, table=0, n_packets=0, n_bytes=0, priority=1,icmp,nw_src=10.0.0.1,nw_dst=10.0.0.2 actions=NORMAL
 cookie=0x2, duration=335.362s, table=0, n_packets=0, n_bytes=0, priority=1,icmp,nw_src=10.0.0.2,nw_dst=10.0.0.1 actions=NORMAL
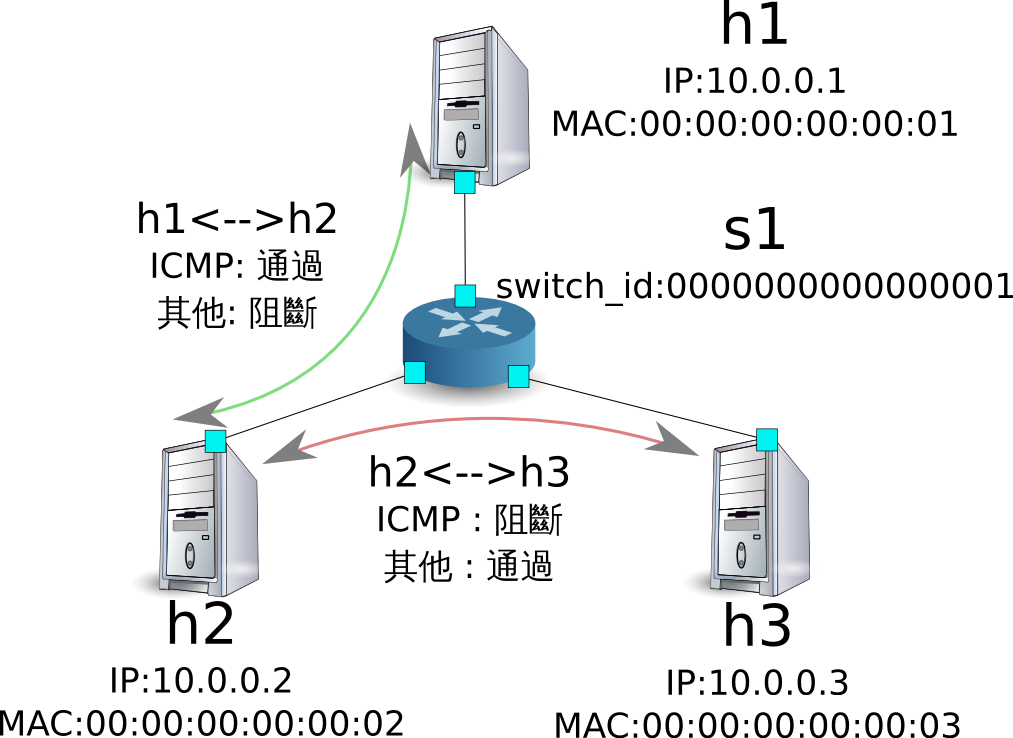
可以設定規則的優先權。
新增阻斷 h2 和 h3 之間的 ping( ICMP )封包規則。 優先權的預設值設定為大於 1 的值。
| 優先權 | 來源 | 目的 | 通訊協定 | 連線狀態 | 規則ID |
|---|---|---|---|---|---|
| 10 | 10.0.0.2/32 | 10.0.0.3/32 | ICMP | 中斷 | 5 |
| 10 | 10.0.0.3/32 | 10.0.0.2/32 | ICMP | 中斷 | 6 |
Node: c0 (root):
root@ryu-vm:~# curl -X POST -d  '{"nw_src": "10.0.0.2/32", "nw_dst": "10.0.0.3/32", "nw_proto": "ICMP", "actions": "DENY", "priority": "10"}' http://localhost:8080/firewall/rules/0000000000000001
  [
    {
      "switch_id": "0000000000000001",
      "command_result": [
        {
          "result": "success",
          "details": "Rule added. : rule_id=5"
        }
      ]
    }
  ]

root@ryu-vm:~# curl -X POST -d  '{"nw_src": "10.0.0.3/32", "nw_dst": "10.0.0.2/32", "nw_proto": "ICMP", "actions": "DENY", "priority": "10"}' http://localhost:8080/firewall/rules/0000000000000001
  [
    {
      "switch_id": "0000000000000001",
      "command_result": [
        {
          "result": "success",
          "details": "Rule added. : rule_id=6"
        }
      ]
    }
  ]
新增的規則做為 Flow Entry 註冊到交換器當中。
switch: s1 (root):
root@ryu-vm:~# ovs-ofctl -O openflow13 dump-flows s1
OFPST_FLOW reply (OF1.3) (xid=0x2):
 cookie=0x3, duration=242.155s, table=0, n_packets=0, n_bytes=0, priority=1,ip,nw_src=10.0.0.2,nw_dst=10.0.0.3 actions=NORMAL
 cookie=0x4, duration=233.099s, table=0, n_packets=0, n_bytes=0, priority=1,ip,nw_src=10.0.0.3,nw_dst=10.0.0.2 actions=NORMAL
 cookie=0x0, duration=1270.233s, table=0, n_packets=10, n_bytes=420, priority=65534,arp actions=NORMAL
 cookie=0x0, duration=989s, table=0, n_packets=20, n_bytes=1960, priority=0 actions=CONTROLLER:128
 cookie=0x5, duration=26.984s, table=0, n_packets=0, n_bytes=0, priority=10,icmp,nw_src=10.0.0.2,nw_dst=10.0.0.3 actions=CONTROLLER:128
 cookie=0x1, duration=591.578s, table=0, n_packets=0, n_bytes=0, priority=1,icmp,nw_src=10.0.0.1,nw_dst=10.0.0.2 actions=NORMAL
 cookie=0x6, duration=14.523s, table=0, n_packets=0, n_bytes=0, priority=10,icmp,nw_src=10.0.0.3,nw_dst=10.0.0.2 actions=CONTROLLER:128
 cookie=0x2, duration=564.793s, table=0, n_packets=0, n_bytes=0, priority=1,icmp,nw_src=10.0.0.2,nw_dst=10.0.0.1 actions=NORMAL
確認規則
確認已經設定完成的規則。
Node: c0 (root):
root@ryu-vm:~# curl http://localhost:8080/firewall/rules/0000000000000001
  [
    {
      "access_control_list": [
        {
          "rules": [
            {
              "priority": 1,
              "dl_type": "IPv4",
              "nw_dst": "10.0.0.3",
              "nw_src": "10.0.0.2",
              "rule_id": 3,
              "actions": "ALLOW"
            },
            {
              "priority": 1,
              "dl_type": "IPv4",
              "nw_dst": "10.0.0.2",
              "nw_src": "10.0.0.3",
              "rule_id": 4,
              "actions": "ALLOW"
            },
            {
              "priority": 10,
              "dl_type": "IPv4",
              "nw_proto": "ICMP",
              "nw_dst": "10.0.0.3",
              "nw_src": "10.0.0.2",
              "rule_id": 5,
              "actions": "DENY"
            },
            {
              "priority": 1,
              "dl_type": "IPv4",
              "nw_proto": "ICMP",
              "nw_dst": "10.0.0.2",
              "nw_src": "10.0.0.1",
              "rule_id": 1,
              "actions": "ALLOW"
            },
            {
              "priority": 10,
              "dl_type": "IPv4",
              "nw_proto": "ICMP",
              "nw_dst": "10.0.0.2",
              "nw_src": "10.0.0.3",
              "rule_id": 6,
              "actions": "DENY"
            },
            {
              "priority": 1,
              "dl_type": "IPv4",
              "nw_proto": "ICMP",
              "nw_dst": "10.0.0.1",
              "nw_src": "10.0.0.2",
              "rule_id": 2,
              "actions": "ALLOW"
            }
          ]
        }
      ],
      "switch_id": "0000000000000001"
    }
  ]
設定完成的規則如下。
從 h1 向 h2 執行 ping 。如果允許的規則有被正確設定的話,ping 就可以正常連線。
host: h1:
root@ryu-vm:~# ping 10.0.0.2
PING 10.0.0.2 (10.0.0.2) 56(84) bytes of data.
64 bytes from 10.0.0.2: icmp_req=1 ttl=64 time=0.419 ms
64 bytes from 10.0.0.2: icmp_req=2 ttl=64 time=0.047 ms
64 bytes from 10.0.0.2: icmp_req=3 ttl=64 time=0.060 ms
64 bytes from 10.0.0.2: icmp_req=4 ttl=64 time=0.033 ms
...
從 h1 發送到 h2 非 ping 的封包會被防火牆所阻擋。例如從 h1 發送到 h2 的 wget 指令就會被阻擋下來並記錄在記錄檔( log )中。
host: h1:
root@ryu-vm:~# wget http://10.0.0.2
--2013-12-16 15:00:38--  http://10.0.0.2/
Connecting to 10.0.0.2:80... ^C
controller: c0 (root):
[FW][INFO] dpid=0000000000000001: Blocked packet = ethernet(dst='00:00:00:00:00:02',ethertype=2048,src='00:00:00:00:00:01'), ipv4(csum=4812,dst='10.0.0.2',flags=2,header_length=5,identification=5102,offset=0,option=None,proto=6,src='10.0.0.1',tos=0,total_length=60,ttl=64,version=4), tcp(ack=0,bits=2,csum=45753,dst_port=80,offset=10,option='\x02\x04\x05\xb4\x04\x02\x08\n\x00H:\x99\x00\x00\x00\x00\x01\x03\x03\t',seq=1021913463,src_port=42664,urgent=0,window_size=14600)
...
h2 和 h3 之間除了 ping 以外的封包則允許被通過。例如從 h2 向 h3 發送 ssh 指令,記錄檔( log )中並不會出現封包被阻擋的記錄( 如果 ssh 是發送到 h3 以外的地點,則 ssh 的連線將會失敗 )。
host: h2:
root@ryu-vm:~# ssh 10.0.0.3
ssh: connect to host 10.0.0.3 port 22: Connection refused
從 h2 向 h3 發送 ping 指令,封包將會被防火牆所阻擋,並出現在記錄檔( log )中。
host: h2:
root@ryu-vm:~# ping 10.0.0.3
PING 10.0.0.3 (10.0.0.3) 56(84) bytes of data.
^C
--- 10.0.0.3 ping statistics ---
8 packets transmitted, 0 received, 100% packet loss, time 7055ms
controller: c0 (root):
[FW][INFO] dpid=0000000000000001: Blocked packet = ethernet(dst='00:00:00:00:00:03',ethertype=2048,src='00:00:00:00:00:02'), ipv4(csum=9893,dst='10.0.0.3',flags=2,header_length=5,identification=0,offset=0,option=None,proto=1,src='10.0.0.2',tos=0,total_length=84,ttl=64,version=4), icmp(code=0,csum=35642,data=echo(data='\r\x12\xcaR\x00\x00\x00\x00\xab\x8b\t\x00\x00\x00\x00\x00\x10\x11\x12\x13\x14\x15\x16\x17\x18\x19\x1a\x1b\x1c\x1d\x1e\x1f !"#$%&\'()*+,-./01234567',id=8705,seq=1),type=8)
...
刪除規則
刪除 “rule_id:5” 和 “rule_id:6” 的規則。
Node: c0 (root):
root@ryu-vm:~# curl -X DELETE -d '{"rule_id": "5"}' http://localhost:8080/firewall/rules/0000000000000001
  [
    {
      "switch_id": "0000000000000001",
      "command_result": [
        {
          "result": "success",
          "details": "Rule deleted. : ruleID=5"
        }
      ]
    }
  ]

root@ryu-vm:~# curl -X DELETE -d '{"rule_id": "6"}' http://localhost:8080/firewall/rules/0000000000000001
  [
    {
      "switch_id": "0000000000000001",
      "command_result": [
        {
          "result": "success",
          "details": "Rule deleted. : ruleID=6"
        }
      ]
    }
  ]
現在的規則如下圖所示。
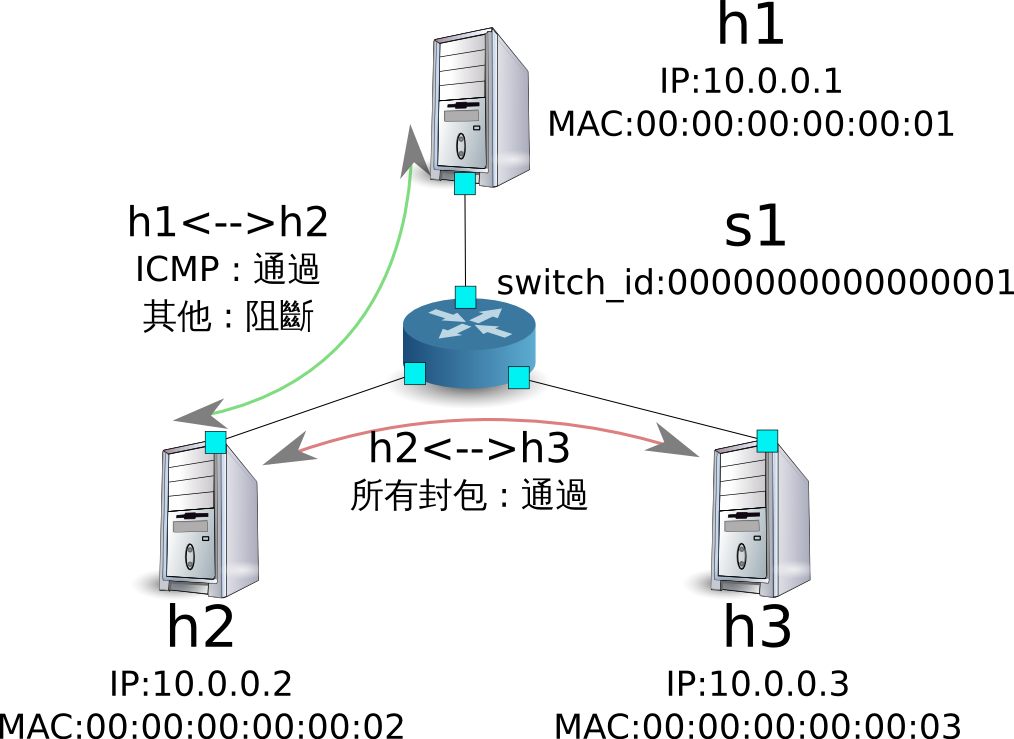
經實際確認。h2 和 h3 之間的 ping( ICMP )阻擋連線的規則刪除後, ping 指令現在可以被正常執行並進行通訊。
host: h2:
root@ryu-vm:~# ping 10.0.0.3
PING 10.0.0.3 (10.0.0.3) 56(84) bytes of data.
64 bytes from 10.0.0.3: icmp_req=1 ttl=64 time=0.841 ms
64 bytes from 10.0.0.3: icmp_req=2 ttl=64 time=0.036 ms
64 bytes from 10.0.0.3: icmp_req=3 ttl=64 time=0.026 ms
64 bytes from 10.0.0.3: icmp_req=4 ttl=64 time=0.033 ms
...
Multi tenant 操作範例
接下來這個例子將建立拓璞並使用 VLAN 來對 tenants 進行處理,還有像是路由或是位址對於交換器 s1 對的新增或刪除,以及每一個連接埠之間的連通做驗證。
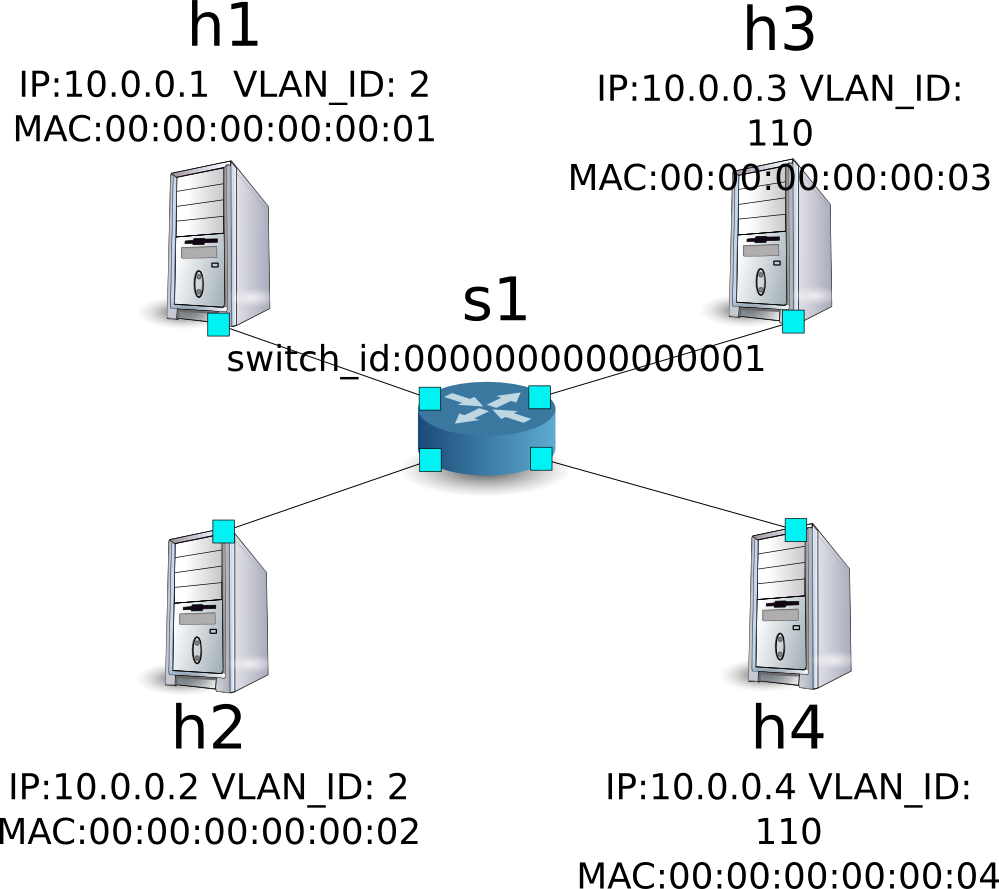
環境構築
下面的例子使用 Single-tenant ,在 Mininet 上進行環境的建置,另外開啟一個 xterm 做為控制 Controller 的方法,請注意與之前相比這邊需要多一台 host。
ryu@ryu-vm:~$ sudo mn --topo single,4 --mac --switch ovsk --controller remote -x
*** Creating network
*** Adding controller
Unable to contact the remote controller at 127.0.0.1:6633
*** Adding hosts:
h1 h2 h3 h4
*** Adding switches:
s1
*** Adding links:
(h1, s1) (h2, s1) (h3, s1) (h4, s1)
*** Configuring hosts
h1 h2 h3 h4
*** Running terms on localhost:10.0
*** Starting controller
*** Starting 1 switches
s1

*** Starting CLI:
mininet> xterm c0
mininet>
接下來到每一個 host 的界面中設定 VLAN ID。
host: h1:
root@ryu-vm:~# ip addr del 10.0.0.1/8 dev h1-eth0
root@ryu-vm:~# ip link add link h1-eth0 name h1-eth0.2 type vlan id 2
root@ryu-vm:~# ip addr add 10.0.0.1/8 dev h1-eth0.2
root@ryu-vm:~# ip link set dev h1-eth0.2 up
host: h2:
root@ryu-vm:~# ip addr del 10.0.0.2/8 dev h2-eth0
root@ryu-vm:~# ip link add link h2-eth0 name h2-eth0.2 type vlan id 2
root@ryu-vm:~# ip addr add 10.0.0.2/8 dev h2-eth0.2
root@ryu-vm:~# ip link set dev h2-eth0.2 up
host: h3:
root@ryu-vm:~# ip addr del 10.0.0.3/8 dev h3-eth0
root@ryu-vm:~# ip link add link h3-eth0 name h3-eth0.110 type vlan id 110
root@ryu-vm:~# ip addr add 10.0.0.3/8 dev h3-eth0.110
root@ryu-vm:~# ip link set dev h3-eth0.110 up
host: h4:
root@ryu-vm:~# ip addr del 10.0.0.4/8 dev h4-eth0
root@ryu-vm:~# ip link add link h4-eth0 name h4-eth0.110 type vlan id 110
root@ryu-vm:~# ip addr add 10.0.0.4/8 dev h4-eth0.110
root@ryu-vm:~# ip link set dev h4-eth0.110 up
接著將使用的 OpenFlow 版本設定為 1.3。
switch: s1 (root):
root@ryu-vm:~# ovs-vsctl set Bridge s1 protocols=OpenFlow13
最後,從 controller 的 xterm 畫面中啟動 rest_firewall 。
controller: c0 (root):
root@ryu-vm:~# ryu-manager ryu.app.rest_firewall
loading app ryu.app.rest_firewall
loading app ryu.controller.ofp_handler
instantiating app None of DPSet
creating context dpset
creating context wsgi
instantiating app ryu.app.rest_firewall of RestFirewallAPI
instantiating app ryu.controller.ofp_handler of OFPHandler
(13419) wsgi starting up on http://0.0.0.0:8080/
Ryu 和交換器之間的連線已經成功的話,就會出現接下來的訊息。
controller: c0 (root):
[FW][INFO] switch_id=0000000000000001: Join as firewall
變更初始狀態
啟動防火牆。
Node: c0 (root):
root@ryu-vm:~# curl -X PUT http://localhost:8080/firewall/module/enable/0000000000000001
  [
    {
      "switch_id": "0000000000000001",
      "command_result": {
        "result": "success",
        "details": "firewall running."
      }
    }
  ]

root@ryu-vm:~# curl http://localhost:8080/firewall/module/status
  [
    {
      "status": "enable",
      "switch_id": "0000000000000001"
    }
  ]
新增規則
新增允許使用 VLAN_ID = 2 向 10.0.0.0/8 發送 ping 訊息( ICMP封包 )的規則到交換器中, 設定雙向的規則是必要的。
| 優先權 | VLAN ID | 來源 | 目的 | 通訊協定 | 連線狀態 | 規則ID |
|---|---|---|---|---|---|---|
| 1 | 2 | 10.0.0.0/8 | any | ICMP | 通過 | 1 |
| 1 | 2 | any | 10.0.0.0/8 | ICMP | 通過 | 2 |
Node: c0 (root):
root@ryu-vm:~# curl -X POST -d '{"nw_src": "10.0.0.0/8", "nw_proto": "ICMP"}' http://localhost:8080/firewall/rules/0000000000000001/2
  [
    {
      "switch_id": "0000000000000001",
      "command_result": [
        {
          "result": "success",
          "vlan_id": 2,
          "details": "Rule added. : rule_id=1"
        }
      ]
    }
  ]

root@ryu-vm:~# curl -X POST -d '{"nw_dst": "10.0.0.0/8", "nw_proto": "ICMP"}' http://localhost:8080/firewall/rules/0000000000000001/2
  [
    {
      "switch_id": "0000000000000001",
      "command_result": [
        {
          "result": "success",
          "vlan_id": 2,
          "details": "Rule added. : rule_id=2"
        }
      ]
    }
  ]
規則確認
確認已經設定的規則。
Node: c0 (root):
root@ryu-vm:~# curl http://localhost:8080/firewall/rules/0000000000000001/all
  [
    {
      "access_control_list": [
        {
          "rules": [
            {
              "priority": 1,
              "dl_type": "IPv4",
              "nw_proto": "ICMP",
              "dl_vlan": 2,
              "nw_src": "10.0.0.0/8",
              "rule_id": 1,
              "actions": "ALLOW"
            },
            {
              "priority": 1,
              "dl_type": "IPv4",
              "nw_proto": "ICMP",
              "nw_dst": "10.0.0.0/8",
              "dl_vlan": 2,
              "rule_id": 2,
              "actions": "ALLOW"
            }
          ],
          "vlan_id": 2
        }
      ],
      "switch_id": "0000000000000001"
    }
  ]
讓我們確認一下實際狀況。在 VLAN_ID = 2 的情況下,從 h1 發送的 ping 在 h2 也同樣是 VLAN_ID = 2 的情況下,你會發現他是連通的,因為我們剛才已經把規則加入。
host: h1:
root@ryu-vm:~# ping 10.0.0.2
PING 10.0.0.2 (10.0.0.2) 56(84) bytes of data.
64 bytes from 10.0.0.2: icmp_req=1 ttl=64 time=0.893 ms
64 bytes from 10.0.0.2: icmp_req=2 ttl=64 time=0.098 ms
64 bytes from 10.0.0.2: icmp_req=3 ttl=64 time=0.122 ms
64 bytes from 10.0.0.2: icmp_req=4 ttl=64 time=0.047 ms
...
VLAN_ID = 110 的情況下 h3 和 h4 之間,由於規則沒有被加入,所以 ping 封包被阻擋。
host: h3:
root@ryu-vm:~# ping 10.0.0.4
PING 10.0.0.4 (10.0.0.4) 56(84) bytes of data.
^C
--- 10.0.0.4 ping statistics ---
6 packets transmitted, 0 received, 100% packet loss, time 4999ms
封包被阻斷的時候會被記錄在記錄檔( log )之中。
controller: c0 (root):
[FW][INFO] dpid=0000000000000001: Blocked packet = ethernet(dst='00:00:00:00:00:04',ethertype=33024,src='00:00:00:00:00:03'), vlan(cfi=0,ethertype=2048,pcp=0,vid=110), ipv4(csum=9891,dst='10.0.0.4',flags=2,header_length=5,identification=0,offset=0,option=None,proto=1,src='10.0.0.3',tos=0,total_length=84,ttl=64,version=4), icmp(code=0,csum=58104,data=echo(data='\xb8\xa9\xaeR\x00\x00\x00\x00\xce\xe3\x02\x00\x00\x00\x00\x00\x10\x11\x12\x13\x14\x15\x16\x17\x18\x19\x1a\x1b\x1c\x1d\x1e\x1f !"#$%&\'()*+,-./01234567',id=7760,seq=4),type=8)
...
本章中,透過具體的例子說明學到如何使用防火牆。
REST API 列表
本章說明中所提到的 rest_firewall REST API 一覽。
取得交換器的防火牆狀態
| 方法 | GET |
| URL | /firewall/module/status |
變更交換器的防火牆狀態
| 方法 | PUT |
| URL | /firewall/module/{ op }/{ switch } – op : [ “enable” | “disable” ] – switch : [ “all” | 交換器ID ] |
| 備註 | 交換器的初始狀態均為 “disable” |
取得全部規則
| 方法 | GET |
| URL | /firewall/rules/{ switch }[/{ vlan }] – switch : [ “all” | 交換器ID ] – vlan: [ “all” | VLAN ID ] |
| 備註 | VLAN ID的指定可選擇加或不加。 |
新增規則
| 方法 | POST |
| URL | /firewall/rules/{ switch }[/{ vlan }] – switch : [ “all” | 交換器ID ] – vlan : [ “all” | VLAN ID ] |
| 資料 | priority :[ 0 - 65535 ] in_port :[ 0 - 65535 ] dl_src :”<xx:xx:xx:xx:xx:xx>” dl_dst :”<xx:xx:xx:xx:xx:xx>” dl_type :[ “ARP” | “IPv4” ] nw_src :”<xxx.xxx.xxx.xxx/xx>” nw_dst :”<xxx.xxx.xxx.xxx/xx”> nw_proto ”:[ “TCP” | “UDP” | “ICMP” ] tp_src :[ 0 - 65535 ] tp_dst :[ 0 - 65535 ] actions : [ “ALLOW” | “DENY” ] |
| 備註 | 註冊成功的規則會自動產生規則 ID,並註明在回應的訊息中。 指定 VLAN ID 為可附加之選項。 |
刪除規則
| 方法 | DELETE |
| URL | /firewall/rules/{ switch }[/{ vlan }] – switch : [ “all” | 交換器ID ] – vlan : [ “all” | VLAN ID ] |
| 資料 | rule_id : [ “all” | 1 - ... ] |
| 備註 | 指定 VLAN ID 為可附加之選項。 |
取得交換器的記錄檔
| 方法 | GET |
| URL | /firewall/log/status |
變更交換器記錄檔的狀態
| 方法 | PUT |
| URL | /firewall/log/{ op }/{ switch } – op: [ “enable” | “disable” ] – switch: [ “all” | 交換器ID ] |
| 備註 | 設定每一個交換器的初始狀態為”啟用” |