路由器( Router )
本章將說明如何使用 REST 來設定一個路由器。
Single Tenant 的操作範例
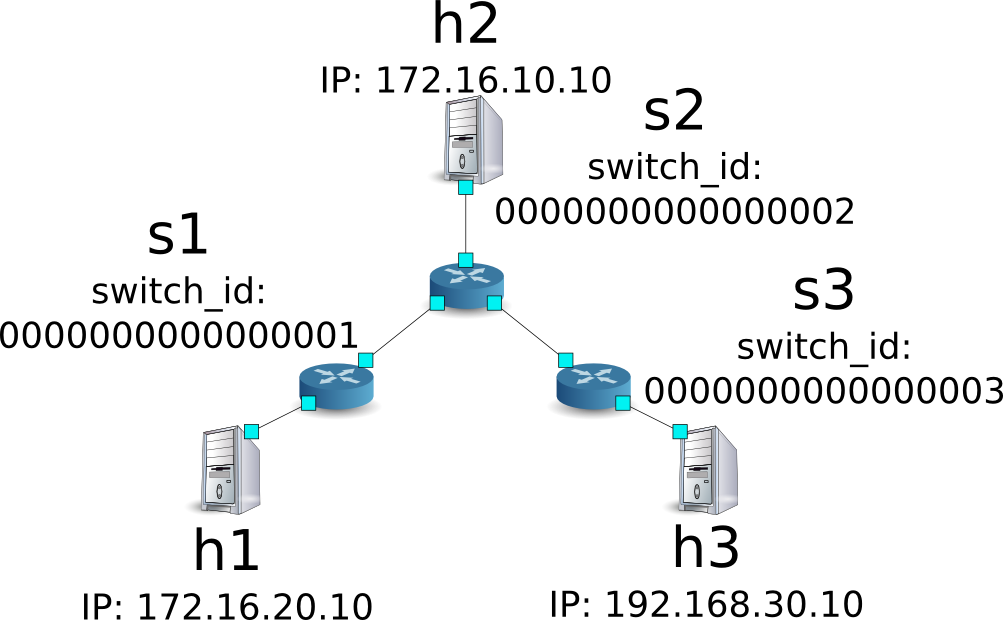
下面的例子介紹如何建立拓璞,每個交換器( 路由器 )的位址新增或刪除,及確認 host 之間的連線狀況確認。
環境建置
首先要在 Mininet 上建置環境。mn 的命令及參數如下。
| 名稱 | 設定值 | 說明 |
|---|---|---|
| topo | linear,3 | 3 台交換器直接連結的網路拓璞 |
| mac | 無 | 自動設定各 host 的 MAC 位址 |
| switch | ovsk | 使用 Open vSwitch |
| controller | remote | 使用外部的 Controller 做為 OpenFlow controller |
| x | 無 | 啟動 xterm |
執行的動作如下:
ryu@ryu-vm:~$ sudo mn --topo linear,3 --mac --switch ovsk --controller remote -x
*** Creating network
*** Adding controller
Unable to contact the remote controller at 127.0.0.1:6633
*** Adding hosts:
h1 h2 h3
*** Adding switches:
s1 s2 s3
*** Adding links:
(h1, s1) (h2, s2) (h3, s3) (s1, s2) (s2, s3)
*** Configuring hosts
h1 h2 h3
*** Running terms on localhost:10.0
*** Starting controller
*** Starting 3 switches
s1 s2 s3

*** Starting CLI:
mininet>
接著,開啟 Controller 所使用的 xterm。
mininet> xterm c0
mininet>
然後設定每個路由器的 OpenFlow 版本為 1.3。
switch: s1 (root):
root@ryu-vm:~# ovs-vsctl set Bridge s1 protocols=OpenFlow13
switch: s2 (root):
root@ryu-vm:~# ovs-vsctl set Bridge s2 protocols=OpenFlow13
switch: s3 (root):
root@ryu-vm:~# ovs-vsctl set Bridge s3 protocols=OpenFlow13
接著每一個 host 刪除原先自動配置的 IP 位址,並設定新的 IP 位址。
host: h1:
root@ryu-vm:~# ip addr del 10.0.0.1/8 dev h1-eth0
root@ryu-vm:~# ip addr add 172.16.20.10/24 dev h1-eth0
host: h2:
root@ryu-vm:~# ip addr del 10.0.0.2/8 dev h2-eth0
root@ryu-vm:~# ip addr add 172.16.10.10/24 dev h2-eth0
host: h3:
root@ryu-vm:~# ip addr del 10.0.0.3/8 dev h3-eth0
root@ryu-vm:~# ip addr add 192.168.30.10/24 dev h3-eth0
最後在操作 Controller 的 xterm 上啟動 rest_router。
controller: c0 (root):
root@ryu-vm:~# ryu-manager ryu.app.rest_router
loading app ryu.app.rest_router
loading app ryu.controller.ofp_handler
instantiating app None of DPSet
creating context dpset
creating context wsgi
instantiating app ryu.app.rest_router of RestRouterAPI
instantiating app ryu.controller.ofp_handler of OFPHandler
(2212) wsgi starting up on http://0.0.0.0:8080/
若 Ryu 和交換器之間的連接成功,接下來的訊息將會被顯示。
controller: c0 (root):
[RT][INFO] switch_id=0000000000000003: Set SW config for TTL error packet in.
[RT][INFO] switch_id=0000000000000003: Set ARP handling (packet in) flow [cookie=0x0]
[RT][INFO] switch_id=0000000000000003: Set L2 switching (normal) flow [cookie=0x0]
[RT][INFO] switch_id=0000000000000003: Set default route (drop) flow [cookie=0x0]
[RT][INFO] switch_id=0000000000000003: Start cyclic routing table update.
[RT][INFO] switch_id=0000000000000003: Join as router.
...
上述的 log 表示 3 台交換器已經準備完成。
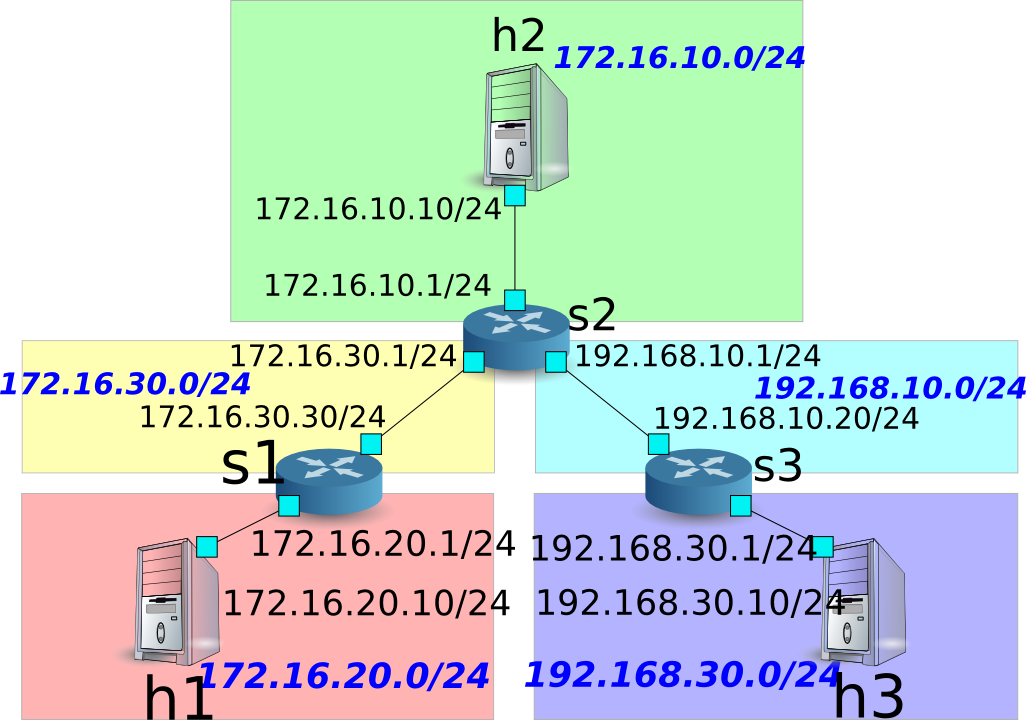
設定 IP 位址
設定每一個路由器的 IP 位址。
首先,設定交換器 s1 的 IP 位址為「172.16.20.1/24」和「172.16.30.30/24」。
備註
接下來的說明中所使用的 REST API 請參考本章結尾的「 REST API 列表 」以取得更詳細的資料。
Node: c0 (root):
root@ryu-vm:~# curl -X POST -d '{"address":"172.16.20.1/24"}' http://localhost:8080/router/0000000000000001
  [
    {
      "switch_id": "0000000000000001",
      "command_result": [
        {
          "result": "success",
          "details": "Add address [address_id=1]"
        }
      ]
    }
  ]

root@ryu-vm:~# curl -X POST -d '{"address": "172.16.30.30/24"}' http://localhost:8080/router/0000000000000001
  [
    {
      "switch_id": "0000000000000001",
      "command_result": [
        {
          "result": "success",
          "details": "Add address [address_id=2]"
        }
      ]
    }
  ]
備註
REST 命令的執行結果已經被整理為較好閱讀的格式。
接著,設定交換器 s2 的 IP 位址為「172.16.10.1/24」、「172.16.30.1/24」和「192.168.10.1/24」。
Node: c0 (root):
root@ryu-vm:~# curl -X POST -d '{"address":"172.16.10.1/24"}' http://localhost:8080/router/0000000000000002
  [
    {
      "switch_id": "0000000000000002",
      "command_result": [
        {
          "result": "success",
          "details": "Add address [address_id=1]"
        }
      ]
    }
  ]

root@ryu-vm:~# curl -X POST -d '{"address": "172.16.30.1/24"}' http://localhost:8080/router/0000000000000002
  [
    {
      "switch_id": "0000000000000002",
      "command_result": [
        {
          "result": "success",
          "details": "Add address [address_id=2]"
        }
      ]
    }
  ]

root@ryu-vm:~# curl -X POST -d '{"address": "192.168.10.1/24"}' http://localhost:8080/router/0000000000000002
  [
    {
      "switch_id": "0000000000000002",
      "command_result": [
        {
          "result": "success",
          "details": "Add address [address_id=3]"
        }
      ]
    }
  ]
接著設定交換器 s3 的 IP 位址為「192.168.30.1/24」和「192.168.10.20/24」。
Node: c0 (root):
root@ryu-vm:~# curl -X POST -d '{"address": "192.168.30.1/24"}' http://localhost:8080/router/0000000000000003
  [
    {
      "switch_id": "0000000000000003",
      "command_result": [
        {
          "result": "success",
          "details": "Add address [address_id=1]"
        }
      ]
    }
  ]

root@ryu-vm:~# curl -X POST -d '{"address": "192.168.10.20/24"}' http://localhost:8080/router/0000000000000003
  [
    {
      "switch_id": "0000000000000003",
      "command_result": [
        {
          "result": "success",
          "details": "Add address [address_id=2]"
        }
      ]
    }
  ]
交換器的 IP 位址已經被設定完成,接著對每一個 host 新增預設的閘道。
host: h1:
root@ryu-vm:~# ip route add default via 172.16.20.1
host: h2:
root@ryu-vm:~# ip route add default via 172.16.10.1
host: h3:
root@ryu-vm:~# ip route add default via 192.168.30.1
設定預設路由
設定每一個路由器的預設路由。
首先,設定路由器 s1 的路由為路由器 s2 。
Node: c0 (root):
root@ryu-vm:~# curl -X POST -d '{"gateway": "172.16.30.1"}' http://localhost:8080/router/0000000000000001
  [
    {
      "switch_id": "0000000000000001",
      "command_result": [
        {
          "result": "success",
          "details": "Add route [route_id=1]"
        }
      ]
    }
  ]
設定路由器 s2 的預設路由為路由器 s1。
Node: c0 (root):
root@ryu-vm:~# curl -X POST -d '{"gateway": "172.16.30.30"}' http://localhost:8080/router/0000000000000002
  [
    {
      "switch_id": "0000000000000002",
      "command_result": [
        {
          "result": "success",
          "details": "Add route [route_id=1]"
        }
      ]
    }
  ]
設定路由器 s3 的預設路由為路由器 s2。
Node: c0 (root):
root@ryu-vm:~# curl -X POST -d '{"gateway": "192.168.10.1"}' http://localhost:8080/router/0000000000000003
  [
    {
      "switch_id": "0000000000000003",
      "command_result": [
        {
          "result": "success",
          "details": "Add route [route_id=1]"
        }
      ]
    }
  ]
設定靜態路由
為了路由器 s2,設定路由器 s3 的靜態路由為( 192.168.30.0/24 )。
Node: c0 (root):
root@ryu-vm:~# curl -X POST -d '{"destination": "192.168.30.0/24", "gateway": "192.168.10.20"}' http://localhost:8080/router/0000000000000002
  [
    {
      "switch_id": "0000000000000002",
      "command_result": [
        {
          "result": "success",
          "details": "Add route [route_id=2]"
        }
      ]
    }
  ]
IP 位址及路由的設定狀態如下。
確認設定的內容
確認每一個路由器的內容。
Node: c0 (root):
root@ryu-vm:~# curl http://localhost:8080/router/0000000000000001
  [
    {
      "internal_network": [
        {
          "route": [
            {
              "route_id": 1,
              "destination": "0.0.0.0/0",
              "gateway": "172.16.30.1"
            }
          ],
          "address": [
            {
              "address_id": 1,
              "address": "172.16.20.1/24"
            },
            {
              "address_id": 2,
              "address": "172.16.30.30/24"
            }
          ]
        }
      ],
      "switch_id": "0000000000000001"
    }
  ]

root@ryu-vm:~# curl http://localhost:8080/router/0000000000000002
  [
    {
      "internal_network": [
        {
          "route": [
            {
              "route_id": 1,
              "destination": "0.0.0.0/0",
              "gateway": "172.16.30.30"
            },
            {
              "route_id": 2,
              "destination": "192.168.30.0/24",
              "gateway": "192.168.10.20"
            }
          ],
          "address": [
            {
              "address_id": 2,
              "address": "172.16.30.1/24"
            },
            {
              "address_id": 3,
              "address": "192.168.10.1/24"
            },
            {
              "address_id": 1,
              "address": "172.16.10.1/24"
            }
          ]
        }
      ],
      "switch_id": "0000000000000002"
    }
  ]

root@ryu-vm:~# curl http://localhost:8080/router/0000000000000003
  [
    {
      "internal_network": [
        {
          "route": [
            {
              "route_id": 1,
              "destination": "0.0.0.0/0",
              "gateway": "192.168.10.1"
            }
          ],
          "address": [
            {
              "address_id": 1,
              "address": "192.168.30.1/24"
            },
            {
              "address_id": 2,
              "address": "192.168.10.20/24"
            }
          ]
        }
      ],
      "switch_id": "0000000000000003"
    }
  ]
在這樣的狀態下,執行 ping 來確認相互間的連接狀態。首先執行從 h2 向 h3 執行 ping。 確認正常連通的狀態。
host: h2:
root@ryu-vm:~# ping 192.168.30.10
PING 192.168.30.10 (192.168.30.10) 56(84) bytes of data.
64 bytes from 192.168.30.10: icmp_req=1 ttl=62 time=48.8 ms
64 bytes from 192.168.30.10: icmp_req=2 ttl=62 time=0.402 ms
64 bytes from 192.168.30.10: icmp_req=3 ttl=62 time=0.089 ms
64 bytes from 192.168.30.10: icmp_req=4 ttl=62 time=0.065 ms
...
接著,從 h2 向 h1 執行 ping 。確認這邊也是正常的連接狀態。
host: h2:
root@ryu-vm:~# ping 172.16.20.10
PING 172.16.20.10 (172.16.20.10) 56(84) bytes of data.
64 bytes from 172.16.20.10: icmp_req=1 ttl=62 time=43.2 ms
64 bytes from 172.16.20.10: icmp_req=2 ttl=62 time=0.306 ms
64 bytes from 172.16.20.10: icmp_req=3 ttl=62 time=0.057 ms
64 bytes from 172.16.20.10: icmp_req=4 ttl=62 time=0.048 ms
...
刪除靜態路由
刪除路由器 s2 上指向路由器 s3 的靜態路由。
Node: c0 (root):
root@ryu-vm:~# curl -X DELETE -d '{"route_id": "2"}' http://localhost:8080/router/0000000000000002
  [
    {
      "switch_id": "0000000000000002",
      "command_result": [
        {
          "result": "success",
          "details": "Delete route [route_id=2]"
        }
      ]
    }
  ]
確認路由器 s2 的設定。這邊可以看到原先指向路由器 s3 的靜態路由已經被刪除了。
Node: c0 (root):
root@ryu-vm:~# curl http://localhost:8080/router/0000000000000002
  [
    {
      "internal_network": [
        {
          "route": [
            {
              "route_id": 1,
              "destination": "0.0.0.0/0",
              "gateway": "172.16.30.30"
            }
          ],
          "address": [
            {
              "address_id": 2,
              "address": "172.16.30.1/24"
            },
            {
              "address_id": 3,
              "address": "192.168.10.1/24"
            },
            {
              "address_id": 1,
              "address": "172.16.10.1/24"
            }
          ]
        }
      ],
      "switch_id": "0000000000000002"
    }
  ]
在這個狀態下,使用 ping 來確認連結狀態。從 h2 向 h3 執行 ping 會發現無法通過連接測試,這是因為我們已經刪除了路由的關係。
host: h2:
root@ryu-vm:~# ping 192.168.30.10
PING 192.168.30.10 (192.168.30.10) 56(84) bytes of data.
^C
--- 192.168.30.10 ping statistics ---
12 packets transmitted, 0 received, 100% packet loss, time 11088ms
刪除 IP 位址
刪除已經設定在路由器 s1 上的 IP 位址「172.16.20.1/24」。
Node: c0 (root):
root@ryu-vm:~# curl -X DELETE -d '{"address_id": "1"}' http://localhost:8080/router/0000000000000001
  [
    {
      "switch_id": "0000000000000001",
      "command_result": [
        {
          "result": "success",
          "details": "Delete address [address_id=1]"
        }
      ]
    }
  ]
確認路由器 s1 的設定狀態。這邊可以看到路由器 s1 中原先被設定的「172.16.20.1/24」已經被刪除。
Node: c0 (root):
root@ryu-vm:~# curl http://localhost:8080/router/0000000000000001
  [
    {
      "internal_network": [
        {
          "route": [
            {
              "route_id": 1,
              "destination": "0.0.0.0/0",
              "gateway": "172.16.30.1"
            }
          ],
          "address": [
            {
              "address_id": 2,
              "address": "172.16.30.30/24"
            }
          ]
        }
      ],
      "switch_id": "0000000000000001"
    }
  ]
在這個狀態下,使用 ping 指令來確認連通的狀況。從 h2 向 h1 執行,這時可以發現由於 h1 的子網路相關設定及路由已經被刪除的關係,是無法連通的。
host: h2:
root@ryu-vm:~# ping 172.16.20.10
PING 172.16.20.10 (172.16.20.10) 56(84) bytes of data.
^C
--- 172.16.20.10 ping statistics ---
19 packets transmitted, 0 received, 100% packet loss, time 18004ms
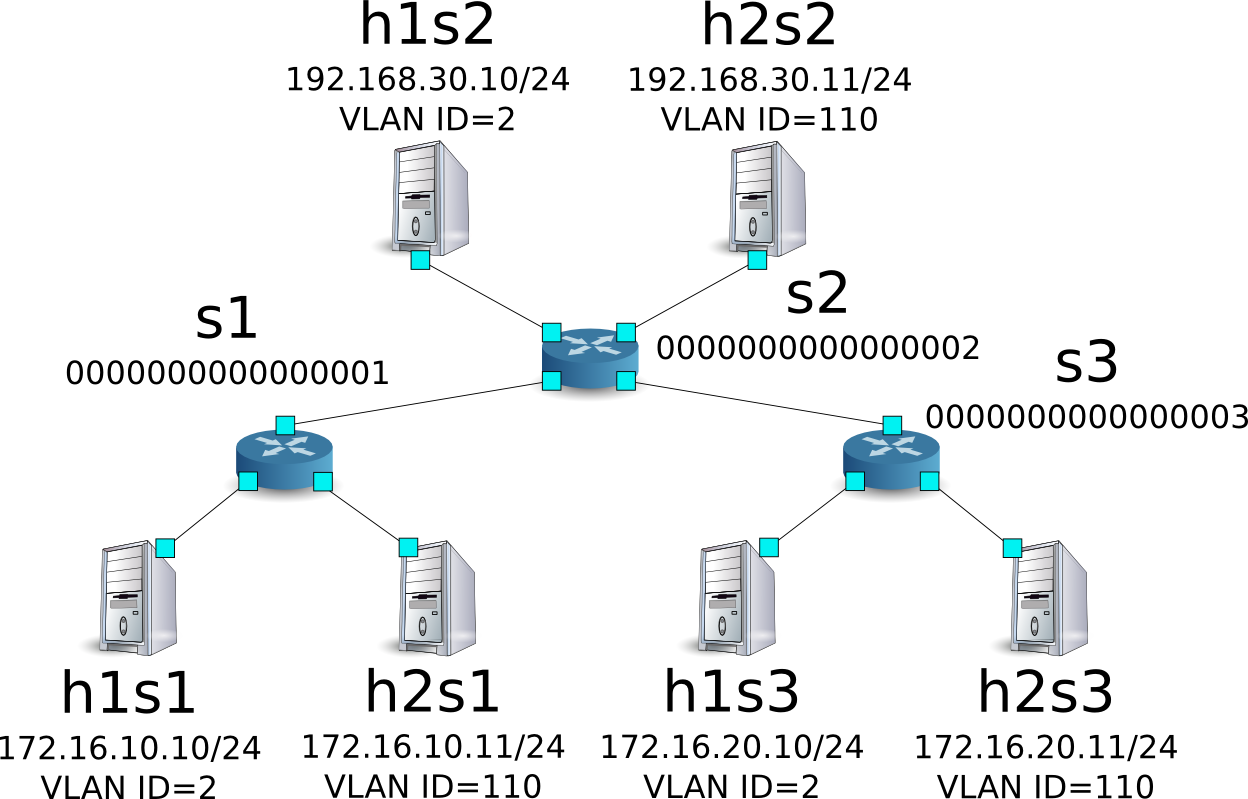
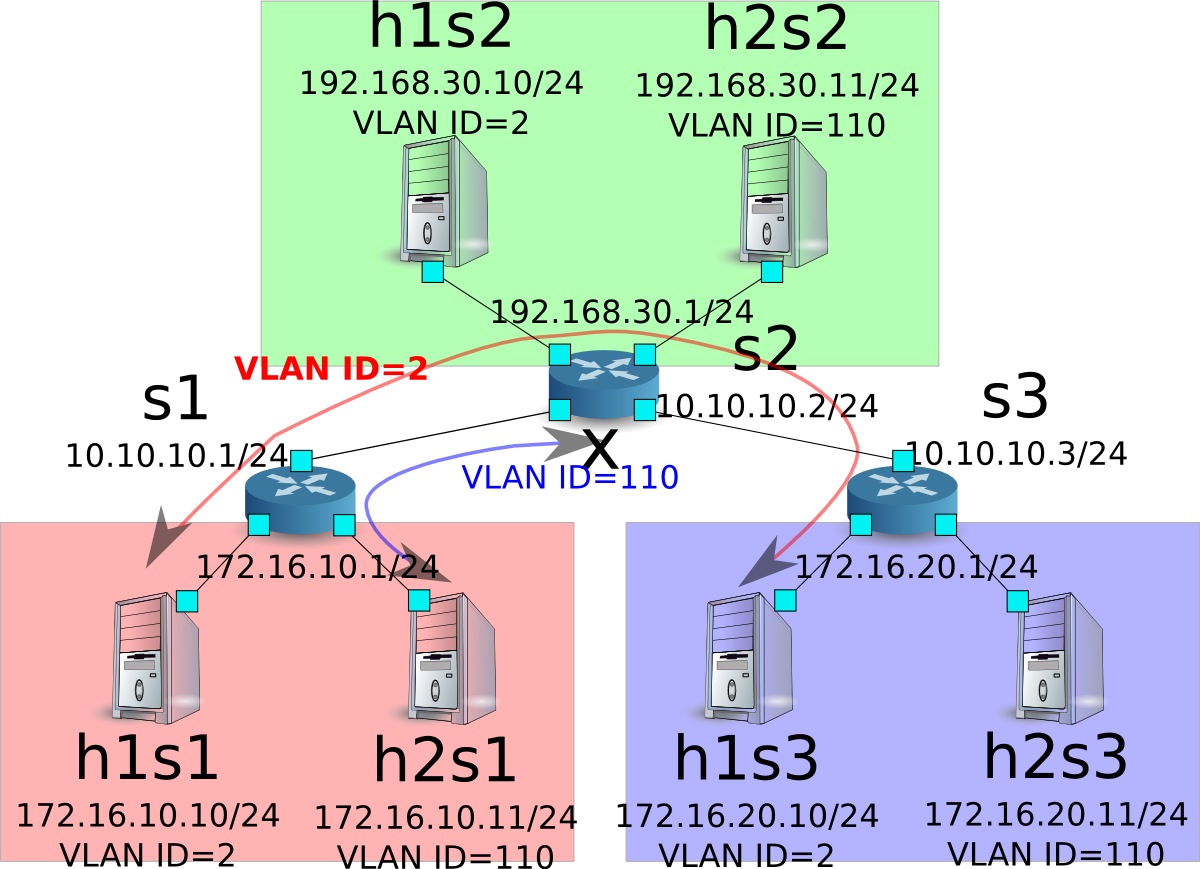
Multi-tenant 的操作範例
接下來的例子將建立一個網路拓璞,使用 VLAN 來分割 tenant 的使用。對各個交換器( 路由器 )的位址或路由進行新增和刪除,並確認每一個 host 之間的連通狀況。
環境建置
首先是在 Mininet 上進行環境的建置。mn 命令的參數如下。
| 參數 | 參數值 | 說明 |
|---|---|---|
| topo | linear,3,2 | 3台交換器直接連結的網路拓璞 ( 每個交換器連接兩台host ) |
| mac | 無 | 自動設定每一個 host 的 MAC 位址 |
| switch | ovsk | 使用 Open vSwitch |
| controller | remote | 使用外部的 OpenFlow Controller |
| x | 無 | 啟動 xterm |
執行的範例如下。
ryu@ryu-vm:~$ sudo mn --topo linear,3,2 --mac --switch ovsk --controller remote -x
*** Creating network
*** Adding controller
Unable to contact the remote controller at 127.0.0.1:6633
*** Adding hosts:
h1s1 h1s2 h1s3 h2s1 h2s2 h2s3
*** Adding switches:
s1 s2 s3
*** Adding links:
(h1s1, s1) (h1s2, s2) (h1s3, s3) (h2s1, s1) (h2s2, s2) (h2s3, s3) (s1, s2) (s2, s3)
*** Configuring hosts
h1s1 h1s2 h1s3 h2s1 h2s2 h2s3
*** Running terms on localhost:10.0
*** Starting controller
*** Starting 3 switches
s1 s2 s3
*** Starting CLI:
mininet>
接著啟動 Controller 用的 xterm。
mininet> xterm c0
mininet>
然後,將每一台路由器所使用的 OpenFlow 版本設定為 1.3。
switch: s1 (root):
root@ryu-vm:~# ovs-vsctl set Bridge s1 protocols=OpenFlow13
switch: s2 (root):
root@ryu-vm:~# ovs-vsctl set Bridge s2 protocols=OpenFlow13
switch: s3 (root):
root@ryu-vm:~# ovs-vsctl set Bridge s3 protocols=OpenFlow13
之後設定每一個 host 的 VLAN ID 和 IP 位址。
host: h1s1:
root@ryu-vm:~# ip addr del 10.0.0.1/8 dev h1s1-eth0
root@ryu-vm:~# ip link add link h1s1-eth0 name h1s1-eth0.2 type vlan id 2
root@ryu-vm:~# ip addr add 172.16.10.10/24 dev h1s1-eth0.2
root@ryu-vm:~# ip link set dev h1s1-eth0.2 up
host: h2s1:
root@ryu-vm:~# ip addr del 10.0.0.4/8 dev h2s1-eth0
root@ryu-vm:~# ip link add link h2s1-eth0 name h2s1-eth0.110 type vlan id 110
root@ryu-vm:~# ip addr add 172.16.10.11/24 dev h2s1-eth0.110
root@ryu-vm:~# ip link set dev h2s1-eth0.110 up
host: h1s2:
root@ryu-vm:~# ip addr del 10.0.0.2/8 dev h1s2-eth0
root@ryu-vm:~# ip link add link h1s2-eth0 name h1s2-eth0.2 type vlan id 2
root@ryu-vm:~# ip addr add 192.168.30.10/24 dev h1s2-eth0.2
root@ryu-vm:~# ip link set dev h1s2-eth0.2 up
host: h2s2:
root@ryu-vm:~# ip addr del 10.0.0.5/8 dev h2s2-eth0
root@ryu-vm:~# ip link add link h2s2-eth0 name h2s2-eth0.110 type vlan id 110
root@ryu-vm:~# ip addr add 192.168.30.11/24 dev h2s2-eth0.110
root@ryu-vm:~# ip link set dev h2s2-eth0.110 up
host: h1s3:
root@ryu-vm:~# ip addr del 10.0.0.3/8 dev h1s3-eth0
root@ryu-vm:~# ip link add link h1s3-eth0 name h1s3-eth0.2 type vlan id 2
root@ryu-vm:~# ip addr add 172.16.20.10/24 dev h1s3-eth0.2
root@ryu-vm:~# ip link set dev h1s3-eth0.2 up
host: h2s3:
root@ryu-vm:~# ip addr del 10.0.0.6/8 dev h2s3-eth0
root@ryu-vm:~# ip link add link h2s3-eth0 name h2s3-eth0.110 type vlan id 110
root@ryu-vm:~# ip addr add 172.16.20.11/24 dev h2s3-eth0.110
root@ryu-vm:~# ip link set dev h2s3-eth0.110 up
最後在連線 Controller 的 xterm 上啟動 rest_router。
controller: c0 (root):
root@ryu-vm:~# ryu-manager ryu.app.rest_router
loading app ryu.app.rest_router
loading app ryu.controller.ofp_handler
instantiating app None of DPSet
creating context dpset
creating context wsgi
instantiating app ryu.app.rest_router of RestRouterAPI
instantiating app ryu.controller.ofp_handler of OFPHandler
(2447) wsgi starting up on http://0.0.0.0:8080/
Ryu 和路由器之間的聯結完成的話會出現下面的訊息。
controller: c0 (root):
[RT][INFO] switch_id=0000000000000003: Set SW config for TTL error packet in.
[RT][INFO] switch_id=0000000000000003: Set ARP handling (packet in) flow [cookie=0x0]
[RT][INFO] switch_id=0000000000000003: Set L2 switching (normal) flow [cookie=0x0]
[RT][INFO] switch_id=0000000000000003: Set default route (drop) flow [cookie=0x0]
[RT][INFO] switch_id=0000000000000003: Start cyclic routing table update.
[RT][INFO] switch_id=0000000000000003: Join as router.
...
上面的記錄表示三台路由器的準備已經完成。
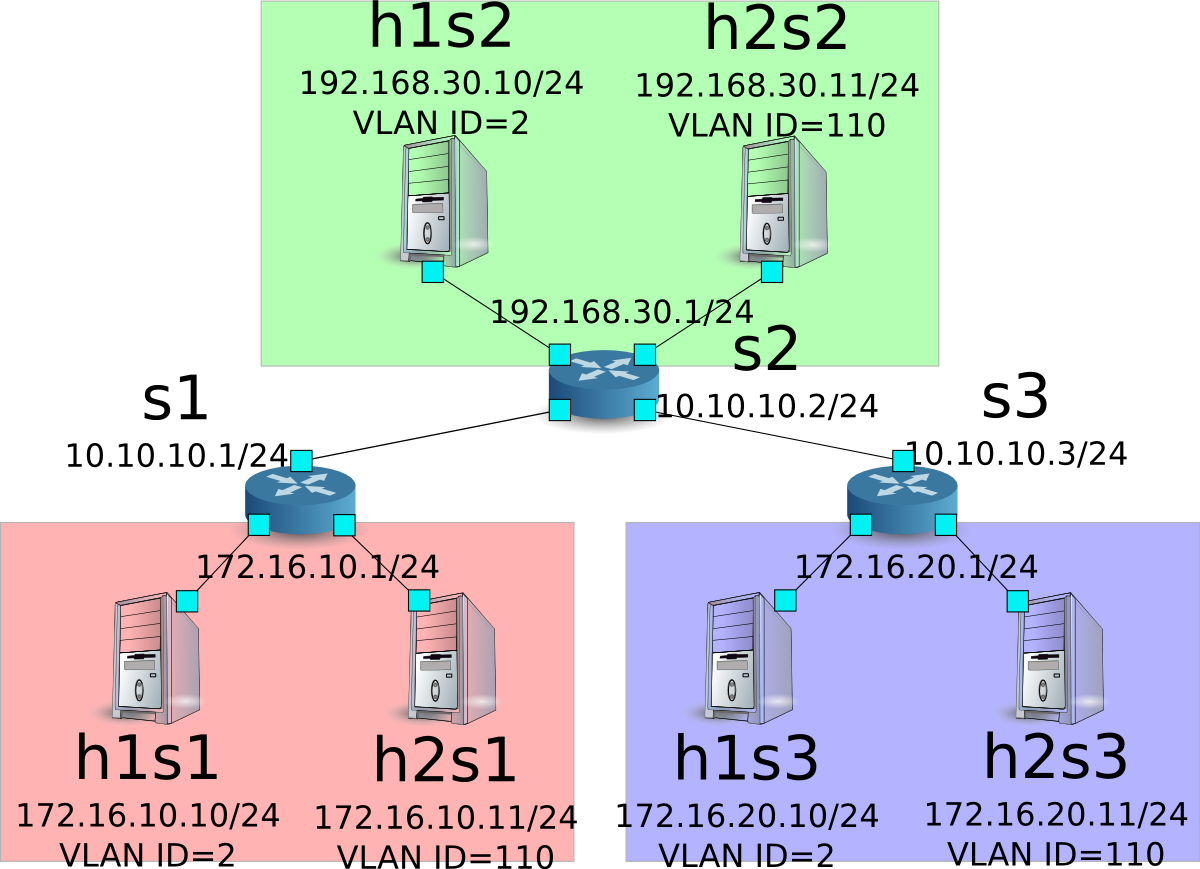
設定 IP 位址
設定每一台路由器的 IP 位址。
首先,設定路由器 s1 的 IP 位址為「172.16.10.1/24」和「10.10.10.1/24」,接著 VLAN ID 的設定也是必要的。
Node: c0 (root):
root@ryu-vm:~# curl -X POST -d '{"address": "172.16.10.1/24"}' http://localhost:8080/router/0000000000000001/2
  [
    {
      "switch_id": "0000000000000001",
      "command_result": [
        {
          "result": "success",
          "vlan_id": 2,
          "details": "Add address [address_id=1]"
        }
      ]
    }
  ]

root@ryu-vm:~# curl -X POST -d '{"address": "10.10.10.1/24"}' http://localhost:8080/router/0000000000000001/2
  [
    {
      "switch_id": "0000000000000001",
      "command_result": [
        {
          "result": "success",
          "vlan_id": 2,
          "details": "Add address [address_id=2]"
        }
      ]
    }
  ]

root@ryu-vm:~# curl -X POST -d '{"address": "172.16.10.1/24"}' http://localhost:8080/router/0000000000000001/110
  [
    {
      "switch_id": "0000000000000001",
      "command_result": [
        {
          "result": "success",
          "vlan_id": 110,
          "details": "Add address [address_id=1]"
        }
      ]
    }
  ]

root@ryu-vm:~# curl -X POST -d '{"address": "10.10.10.1/24"}' http://localhost:8080/router/0000000000000001/110
  [
    {
      "switch_id": "0000000000000001",
      "command_result": [
        {
          "result": "success",
          "vlan_id": 110,
          "details": "Add address [address_id=2]"
        }
      ]
    }
  ]
接下來,設定路由器 s2 的 IP 位址為「192.168.30.1/24」和「10.10.10.2/24」。
Node: c0 (root):
root@ryu-vm:~# curl -X POST -d '{"address": "192.168.30.1/24"}' http://localhost:8080/router/0000000000000002/2
  [
    {
      "switch_id": "0000000000000002",
      "command_result": [
        {
          "result": "success",
          "vlan_id": 2,
          "details": "Add address [address_id=1]"
        }
      ]
    }
  ]

root@ryu-vm:~# curl -X POST -d '{"address": "10.10.10.2/24"}' http://localhost:8080/router/0000000000000002/2
  [
    {
      "switch_id": "0000000000000002",
      "command_result": [
        {
          "result": "success",
          "vlan_id": 2,
          "details": "Add address [address_id=2]"
        }
      ]
    }
  ]

root@ryu-vm:~# curl -X POST -d '{"address": "192.168.30.1/24"}' http://localhost:8080/router/0000000000000002/110
  [
    {
      "switch_id": "0000000000000002",
      "command_result": [
        {
          "result": "success",
          "vlan_id": 110,
          "details": "Add address [address_id=1]"
        }
      ]
    }
  ]

root@ryu-vm:~# curl -X POST -d '{"address": "10.10.10.2/24"}' http://localhost:8080/router/0000000000000002/110
  [
    {
      "switch_id": "0000000000000002",
      "command_result": [
        {
          "result": "success",
          "vlan_id": 110,
          "details": "Add address [address_id=2]"
        }
      ]
    }
  ]
然後設定路由器 s3 的 IP 位址為「172.16.20.1/24」和「10.10.10.3/24」。
Node: c0 (root):
root@ryu-vm:~# curl -X POST -d '{"address": "172.16.20.1/24"}' http://localhost:8080/router/0000000000000003/2
  [
    {
      "switch_id": "0000000000000003",
      "command_result": [
        {
          "result": "success",
          "vlan_id": 2,
          "details": "Add address [address_id=1]"
        }
      ]
    }
  ]

root@ryu-vm:~# curl -X POST -d '{"address": "10.10.10.3/24"}' http://localhost:8080/router/0000000000000003/2
  [
    {
      "switch_id": "0000000000000003",
      "command_result": [
        {
          "result": "success",
          "vlan_id": 2,
          "details": "Add address [address_id=2]"
        }
      ]
    }
  ]

root@ryu-vm:~# curl -X POST -d '{"address": "172.16.20.1/24"}' http://localhost:8080/router/0000000000000003/110
  [
    {
      "switch_id": "0000000000000003",
      "command_result": [
        {
          "result": "success",
          "vlan_id": 110,
          "details": "Add address [address_id=1]"
        }
      ]
    }
  ]

root@ryu-vm:~# curl -X POST -d '{"address": "10.10.10.3/24"}' http://localhost:8080/router/0000000000000003/110
  [
    {
      "switch_id": "0000000000000003",
      "command_result": [
        {
          "result": "success",
          "vlan_id": 110,
          "details": "Add address [address_id=2]"
        }
      ]
    }
  ]
路由器的 IP 位址已經設定好,接著設定每一個 host 的預設閘道器。
host: h1s1:
root@ryu-vm:~# ip route add default via 172.16.10.1
host: h2s1:
root@ryu-vm:~# ip route add default via 172.16.10.1
host: h1s2:
root@ryu-vm:~# ip route add default via 192.168.30.1
host: h2s2:
root@ryu-vm:~# ip route add default via 192.168.30.1
host: h1s3:
root@ryu-vm:~# ip route add default via 172.16.20.1
host: h2s3:
root@ryu-vm:~# ip route add default via 172.16.20.1
IP 位址被設定如下。
設定預設靜態路由
設定每一台路由器的預設靜態路由。
首先,設定路由器 s1 的預設路由為路由器 s2。
Node: c0 (root):
root@ryu-vm:~# curl -X POST -d '{"gateway": "10.10.10.2"}' http://localhost:8080/router/0000000000000001/2
  [
    {
      "switch_id": "0000000000000001",
      "command_result": [
        {
          "result": "success",
          "vlan_id": 2,
          "details": "Add route [route_id=1]"
        }
      ]
    }
  ]

root@ryu-vm:~# curl -X POST -d '{"gateway": "10.10.10.2"}' http://localhost:8080/router/0000000000000001/110
  [
    {
      "switch_id": "0000000000000001",
      "command_result": [
        {
          "result": "success",
          "vlan_id": 110,
          "details": "Add route [route_id=1]"
        }
      ]
    }
  ]
路由器 s2 的預設路由設定為路由器 s1。
Node: c0 (root):
root@ryu-vm:~# curl -X POST -d '{"gateway": "10.10.10.1"}' http://localhost:8080/router/0000000000000002/2
  [
    {
      "switch_id": "0000000000000002",
      "command_result": [
        {
          "result": "success",
          "vlan_id": 2,
          "details": "Add route [route_id=1]"
        }
      ]
    }
  ]

root@ryu-vm:~# curl -X POST -d '{"gateway": "10.10.10.1"}' http://localhost:8080/router/0000000000000002/110
  [
    {
      "switch_id": "0000000000000002",
      "command_result": [
        {
          "result": "success",
          "vlan_id": 110,
          "details": "Add route [route_id=1]"
        }
      ]
    }
  ]
路由器 s3 的預設路由設定為路由器 s2。
Node: c0 (root):
root@ryu-vm:~# curl -X POST -d '{"gateway": "10.10.10.2"}' http://localhost:8080/router/0000000000000003/2
  [
    {
      "switch_id": "0000000000000003",
      "command_result": [
        {
          "result": "success",
          "vlan_id": 2,
          "details": "Add route [route_id=1]"
        }
      ]
    }
  ]

root@ryu-vm:~# curl -X POST -d '{"gateway": "10.10.10.2"}' http://localhost:8080/router/0000000000000003/110
  [
    {
      "switch_id": "0000000000000003",
      "command_result": [
        {
          "result": "success",
          "vlan_id": 110,
          "details": "Add route [route_id=1]"
        }
      ]
    }
  ]
接著為了路由器 s2,將路由器 s3 的靜態路由指向 host( 172.16.20.0/24 ),但僅只有在 VLAN ID = 2的情況下。
Node: c0 (root):
root@ryu-vm:~# curl -X POST -d '{"destination": "172.16.20.0/24", "gateway": "10.10.10.3"}' http://localhost:8080/router/0000000000000002/2
  [
    {
      "switch_id": "0000000000000002",
      "command_result": [
        {
          "result": "success",
          "vlan_id": 2,
          "details": "Add route [route_id=2]"
        }
      ]
    }
  ]
確認設定的內容
確認每一台路由器的設定內容。
Node: c0 (root):
root@ryu-vm:~# curl http://localhost:8080/router/all/all
  [
    {
      "internal_network": [
        {},
        {
          "route": [
            {
              "route_id": 1,
              "destination": "0.0.0.0/0",
              "gateway": "10.10.10.2"
            }
          ],
          "vlan_id": 2,
          "address": [
            {
              "address_id": 2,
              "address": "10.10.10.1/24"
            },
            {
              "address_id": 1,
              "address": "172.16.10.1/24"
            }
          ]
        },
        {
          "route": [
            {
              "route_id": 1,
              "destination": "0.0.0.0/0",
              "gateway": "10.10.10.2"
            }
          ],
          "vlan_id": 110,
          "address": [
            {
              "address_id": 2,
              "address": "10.10.10.1/24"
            },
            {
              "address_id": 1,
              "address": "172.16.10.1/24"
            }
          ]
        }
      ],
      "switch_id": "0000000000000001"
    },
    {
      "internal_network": [
        {},
        {
          "route": [
            {
              "route_id": 2,
              "destination": "172.16.20.0/24",
              "gateway": "10.10.10.3"
            },
            {
              "route_id": 1,
              "destination": "0.0.0.0/0",
              "gateway": "10.10.10.1"
            }
          ],
          "vlan_id": 2,
          "address": [
            {
              "address_id": 2,
              "address": "10.10.10.2/24"
            },
            {
              "address_id": 1,
              "address": "192.168.30.1/24"
            }
          ]
        },
        {
          "route": [
            {
              "route_id": 1,
              "destination": "0.0.0.0/0",
              "gateway": "10.10.10.1"
            }
          ],
          "vlan_id": 110,
          "address": [
            {
              "address_id": 2,
              "address": "10.10.10.2/24"
            },
            {
              "address_id": 1,
              "address": "192.168.30.1/24"
            }
          ]
        }
      ],
      "switch_id": "0000000000000002"
    },
    {
      "internal_network": [
        {},
        {
          "route": [
            {
              "route_id": 1,
              "destination": "0.0.0.0/0",
              "gateway": "10.10.10.2"
            }
          ],
          "vlan_id": 2,
          "address": [
            {
              "address_id": 1,
              "address": "172.16.20.1/24"
            },
            {
              "address_id": 2,
              "address": "10.10.10.3/24"
            }
          ]
        },
        {
          "route": [
            {
              "route_id": 1,
              "destination": "0.0.0.0/0",
              "gateway": "10.10.10.2"
            }
          ],
          "vlan_id": 110,
          "address": [
            {
              "address_id": 1,
              "address": "172.16.20.1/24"
            },
            {
              "address_id": 2,
              "address": "10.10.10.3/24"
            }
          ]
        }
      ],
      "switch_id": "0000000000000003"
    }
  ]
每一台路由器的設定內容將會如下所示。
| 路由器 | VLAN ID | IP 位址 | 預設路由 | 靜態路由 |
|---|---|---|---|---|
| s1 | 2 | 172.16.10.1/24 | 10.10.10.2(s2) | |
| , 10.10.10.1/24 | ||||
| s1 | 110 | 172.16.10.1/24 | 10.10.10.2(s2) | |
| , 10.10.10.1/24 | ||||
| s2 | 2 | 192.168.30.1/24 | 10.10.10.1(s1) | 目的:172.16.20.0/24 |
| , 10.10.10.2/24 | , 閘道:10.10.10.3(s3)” | |||
| s2 | 110 | 192.168.30.1/24 | 10.10.10.1(s1) | |
| , 10.10.10.2/24 | ||||
| s3 | 2 | 172.16.20.1/24 | 10.10.10.2(s2) | |
| , 10.10.10.3/24 | ||||
| s3 | 110 | 172.16.20.1/24 | 10.10.10.2(s2) | |
| , 10.10.10.3/24 |
從 h1s1 向 h1s3 發送 ping 訊息。因為是處於相同的 vlan_id = 2 的相同 host ,且已經設置了指向 s3 的靜態路由在 s2 上,因此應該是可以正常連線的。
host: h1s1:
root@ryu-vm:~# ping 172.16.20.10
PING 172.16.20.10 (172.16.20.10) 56(84) bytes of data.
64 bytes from 172.16.20.10: icmp_req=1 ttl=61 time=45.9 ms
64 bytes from 172.16.20.10: icmp_req=2 ttl=61 time=0.257 ms
64 bytes from 172.16.20.10: icmp_req=3 ttl=61 time=0.059 ms
64 bytes from 172.16.20.10: icmp_req=4 ttl=61 time=0.182 ms
從 h2s1 向 h2s3 發送 ping 封包,雖然他們處於相同的 vlani_id = 110 的 host ,但是路由器 s2 上並沒有設置指向路由器 s3 的靜態路由,因此無法成功連線。
host: h2s1:
root@ryu-vm:~# ping 172.16.20.11
PING 172.16.20.11 (172.16.20.11) 56(84) bytes of data.
^C
--- 172.16.20.11 ping statistics ---
8 packets transmitted, 0 received, 100% packet loss, time 7009ms
在本章中,使用一個具體的例子來說明路由器的使用方法。
REST API 列表
本章所介紹的 rest_router 的 REST API 列表。
取得設定內容
| 方法 | GET |
| URL | /router/{switch}[/{vlan}] |
| – switch: [ “all” | 交換器ID ] | |
| – vlan: [ “all” | VLAN ID ] | |
| 備註 | 指定 VLAN ID 為可選項目。 |
設定位址
| 方法 | POST |
| URL | /router/{switch}[/{vlan}] |
| – switch: [ “all” | 交換器ID ] | |
| – vlan: [ “all” | VLAN ID ] | |
| 內容 | address:”<xxx.xxx.xxx.xxx/xx>” |
| 備註 | 在設定路由之前要先設定位址 |
| 指定 VLAN ID 為可選項目。 |
設定靜態路由
| 方法 | POST |
| URL | /router/{switch}[/{vlan}] |
| – switch: [ “all” | 交換器ID ] | |
| – vlan: [ “all” | VLAN ID ] | |
| 內容 | destination:”<xxx.xxx.xxx.xxx/xx>” |
| gateway:”<xxx.xxx.xxx.xxx>” | |
| 備註 | 指定 VLAN ID 為可選項目。 |
設定預設路由
| 方法 | POST |
| URL | /router/{switch}[/{vlan}] |
| – switch: [ “all” | 交換器ID ] | |
| – vlan: [ “all” | VLAN ID ] | |
| 內容 | gateway:”<xxx.xxx.xxx.xxx>” |
| 備註 | 指定 VLAN ID 為可選項目。 |
刪除位址
| 方法 | DELETE |
| URL | /router/{switch}[/{vlan}] |
| – switch: [ “all” | 交換器ID ] | |
| – vlan: [ “all” | VLAN ID ] | |
| 內容 | address_id:[ 1 - ... ] |
| 備註 | 指定 VLAN ID 為可選項目。 |
刪除路由
| 方法 | DELETE |
| URL | /router/{switch}[/{vlan}] |
| – switch: [ “all” | 交換器ID ] | |
| – vlan: [ “all” | VLAN ID ] | |
| 內容 | route_id:[ 1 - ... ] |
| 備註 | 指定 VLAN ID 為可選項目。 |